For this month’s cemetery recipe, I wanted to try something a little less sugary after indulging in all the sweets this holiday season. So, when I came across this tea biscuit recipe, I thought it might be the perfect fit.
Most of the gravestone recipes I have come across in my research have been desserts, so I was pleasantly surprised when I found this biscuit recipe.
This recipe can be found on the gravestone of Debbie Ann Wilson McNutt, who is laid to rest in Pine Grove Cemetery in Stewiacke East, Nova Scotia. This my first Canadian gravestone recipe.
Debbie passed away on May 19, 2019, just 17 days after her birthday, following a long battle with cancer. She was 65. A beloved teacher and active member of her church, Debbie is remembered for her active lifestyle and for hosting family and friends in the summer.1 She is also fondly remembered for her tea biscuit recipe. According to family and friends, she made these biscuits about once a week.2
It was Debbie’s husband’s idea to engrave the recipe on her gravestone, hoping it would make people smile.2 This family recipe comes from Debbie’s mother, Jessie Wilson, who is still living. According to the family, the biscuits are best enjoyed topped with homemade jam.2
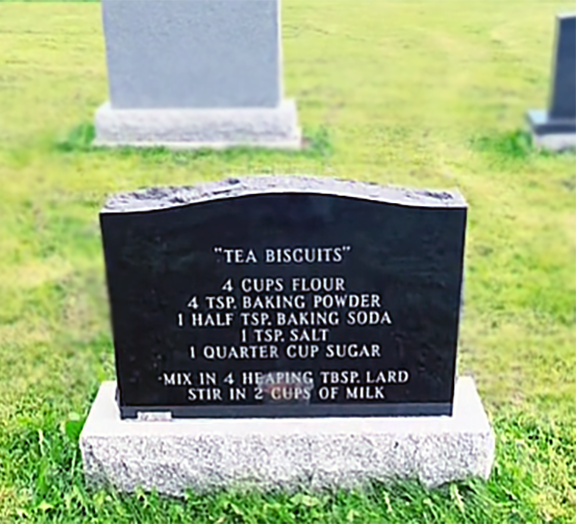
Tea Biscuit recipe on the gravestone of Debbie Ann McNutt. Photo by Rosie Grant.
Here is the recipe as written on the gravestone:
Tea Biscuits
- 4 Cups Flour
- 4 Tsp. Baking Powder
- 1 Half Tsp. Baking Soda
- 1 Tsp. Salt
- 1 Quarter Cup Sugar
Mix in 4 heaping tbsp. lard. Stir in 2 cups of milk.
This recipe was also printed on a memorial card for Debbie, which includes the extra baking instructions2:
Roll out, bake at 400oF degrees until golden brown.
In the Kitchen
I have never made biscuits that didn’t come out of a can before, so I enjoyed putting this recipe together. It was very straightforward to follow and pretty quick and easy.

After setting my oven to preheat at 400oF and gathering all my ingredients, I followed the recipe’s instructions and mixed all the dry ingredients together. After adding the last two wet ingredients, I used a hand mixer to combine everything together.
This is where things got a bit messy, but I trusted the process. Using a hand mixer may not have been the wisest choice, but it got the job done. After the dough was ready, I put down a thin cutting board on my counter to create my rolling space. I floured the surface and my hands and rolled out the dough. The dough is very sticky, so I continuously had to flour the surface and my hands.
To cut out my biscuits, I used a drinking glass because I didn’t have a circular cookie cutter. I also had to repeatedly flour the rim of the glass so the dough wouldn’t stick.
This recipe made a fairly big batch—more than I thought it would. I prepared two baking sheets with parchment paper and placed the uncooked biscuits on the sheets as I cut them out.
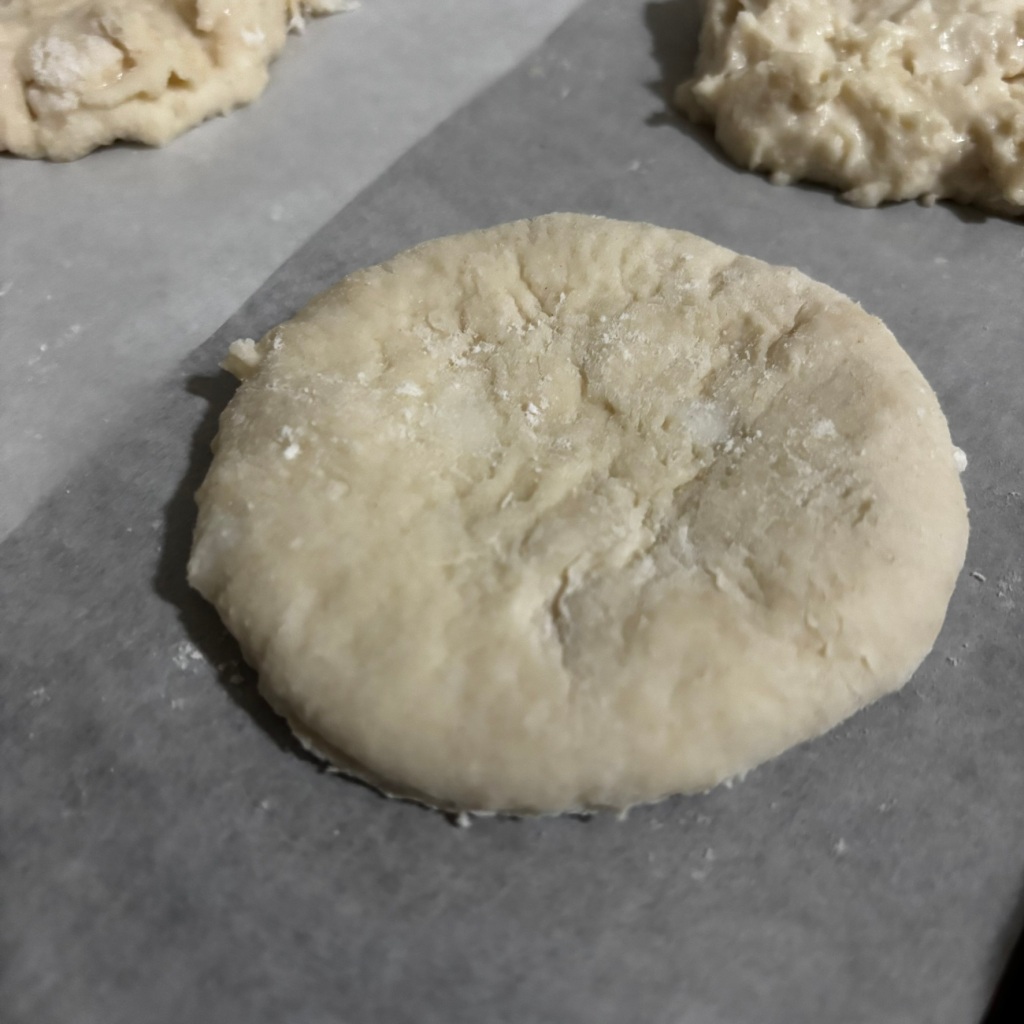
Unfortunately, the recipe doesn’t say how long to bake the biscuits for, only stating to bake until golden brown. I didn’t want to guess, so I did Google how long they should be baked for, and I found that 8 to 16 minutes should do—or until golden brown.
I put them in the oven and set a timer for 8 minutes. They still needed a bit more time after that, so I put them in for another 2 minutes. That seemed to do the trick.
I can see why Debbie would make this at least once a week. They are quick and easy to make, and taste lovely!

Trying out these cemetery recipes always adds an extra layer of meaning to the experience, thanks to the special stories behind them. There’s something truly heartwarming about preparing and sharing a dish that has been passed down through generations—especially one that brings a person’s legacy to life.
Are you planning to try this recipe? Let me know how it turns out! Whether you enjoy your biscuits with jam or as part of a cozy meal, I’m sure they’ll taste even better knowing the meaningful history they carry with them.
Thanks for reading!
References:
- Debbie Ann McNutt obituary | Mattatall-Verner Funeral Home
- Ghostlyarchive | TikTok
