Stone Stories: A Tap Dancing Legend

Earlier this month, two friends and I traveled to Oakville, Ontario for another birthday cemetery road trip. It was a bit ambitious, with us hitting the road at the crack of dawn. We planned to beat the traffic, but also to get a head start on the day since it would be a four-hour drive, each way.

Since it would be such a long drive, we wanted to give ourselves as much time as possible to tour the town and sight-see. And yes, of course, visit cemeteries. There was one stop that was very high on our list—the final resting place of American actor and tap-dancing legend, Gregory Hines.

Gregory Hines

Gregory Oliver Hines was born February 14, 1946, in New York, New York. Hines began tap lessons at the age of four and would spend much of his childhood practicing and performing alongside his older brother, Maurice Hines.1 

The Hines Brothers performed their song-and-dance act all over the United States. In 1963, their father joined them, turning the duo into a trio. They continued to make a name for themselves, making countless TV appearances.1 But in 1973, Hines recognized that tap dancings popularity was declining and left the act to pursue a musical career and start a band. This was short-lived though, and Hines soon returned to New York and the stage.1

In the early 80’s, Hines made the transition to Television and film actor. His first feature film credit is his portrayal of Josephus in the comedy/musical Mel Brook’s History of the World Part I (1981). Known for his accomplished choreography and tap dancing, many of Hines’ films showcase his dancing. He starred alongside veteran tap dancer Sammy Davis Jr. in the 1989 film Tap. Credited with 49 acting roles, Hines was a successful and versatile actor. Some of his most successful films are Running Scared (1986), Renaissance Man (1994), and Waiting to Exhale (1995). I would be remiss if I didn’t also list his cameo in the fan favorite, The Muppets Take Manhattan (1984).2

In 2002, Hines was diagnosed with liver cancer. He kept his diagnosis private, sharing his health struggle with only family and close friends. A year later, Hines succumbed to the illness en route to the hospital, from his home in Los Angeles.3 Gregory Hines passed away on August 9, 2003, he was 57.  

Hines is remembered by his two children, a son, and daughter, from two previous marriages. His memorial service took place on August 13, 2003, at Saint Monica’s Catholic Church in California. Based on the photographs I found online, it looks like it was an emotional service, with many Hollywood stars in attendance. Hines is laid to rest in Saint Volodymyr Ukrainian Cemetery in Oakville, Ontario, beside his fiancé Negrita Maria Truszyk Jayde.

Saint Volodymyr Ukrainian Cemetery

Saint Volodymyr Ukrainian Cemetery, also known as West Oak Memorial Gardens, is owned and operated by St. Volodymyr Cathedral. It was founded in 1984, and sits on 100 acres of property that overlooks Sixteen Mile Creek. Today, it’s thought to be the largest Ukrainian cemetery in Canada.4 

It was a beautiful sunny day when we visited Saint Volodymyr. Right away, we noticed how busy the cemetery was. Many people were visiting loved ones, cleaning gravesites, and paying their respects.

I knew before we arrived that the cemetery was a large one, so I had come prepared. I wanted to make sure we had plenty of time to pay our respects and wouldn’t spend all our time searching. With coordinates in hand, we were able to drive directly to the grave of Gregory Hines. 

I’m not sure if it was done on purpose, or if it is just because of the sheer size of the cemetery, but there was a perfect parking space just off the path. Just big enough for one vehicle, across from the famous grave. 

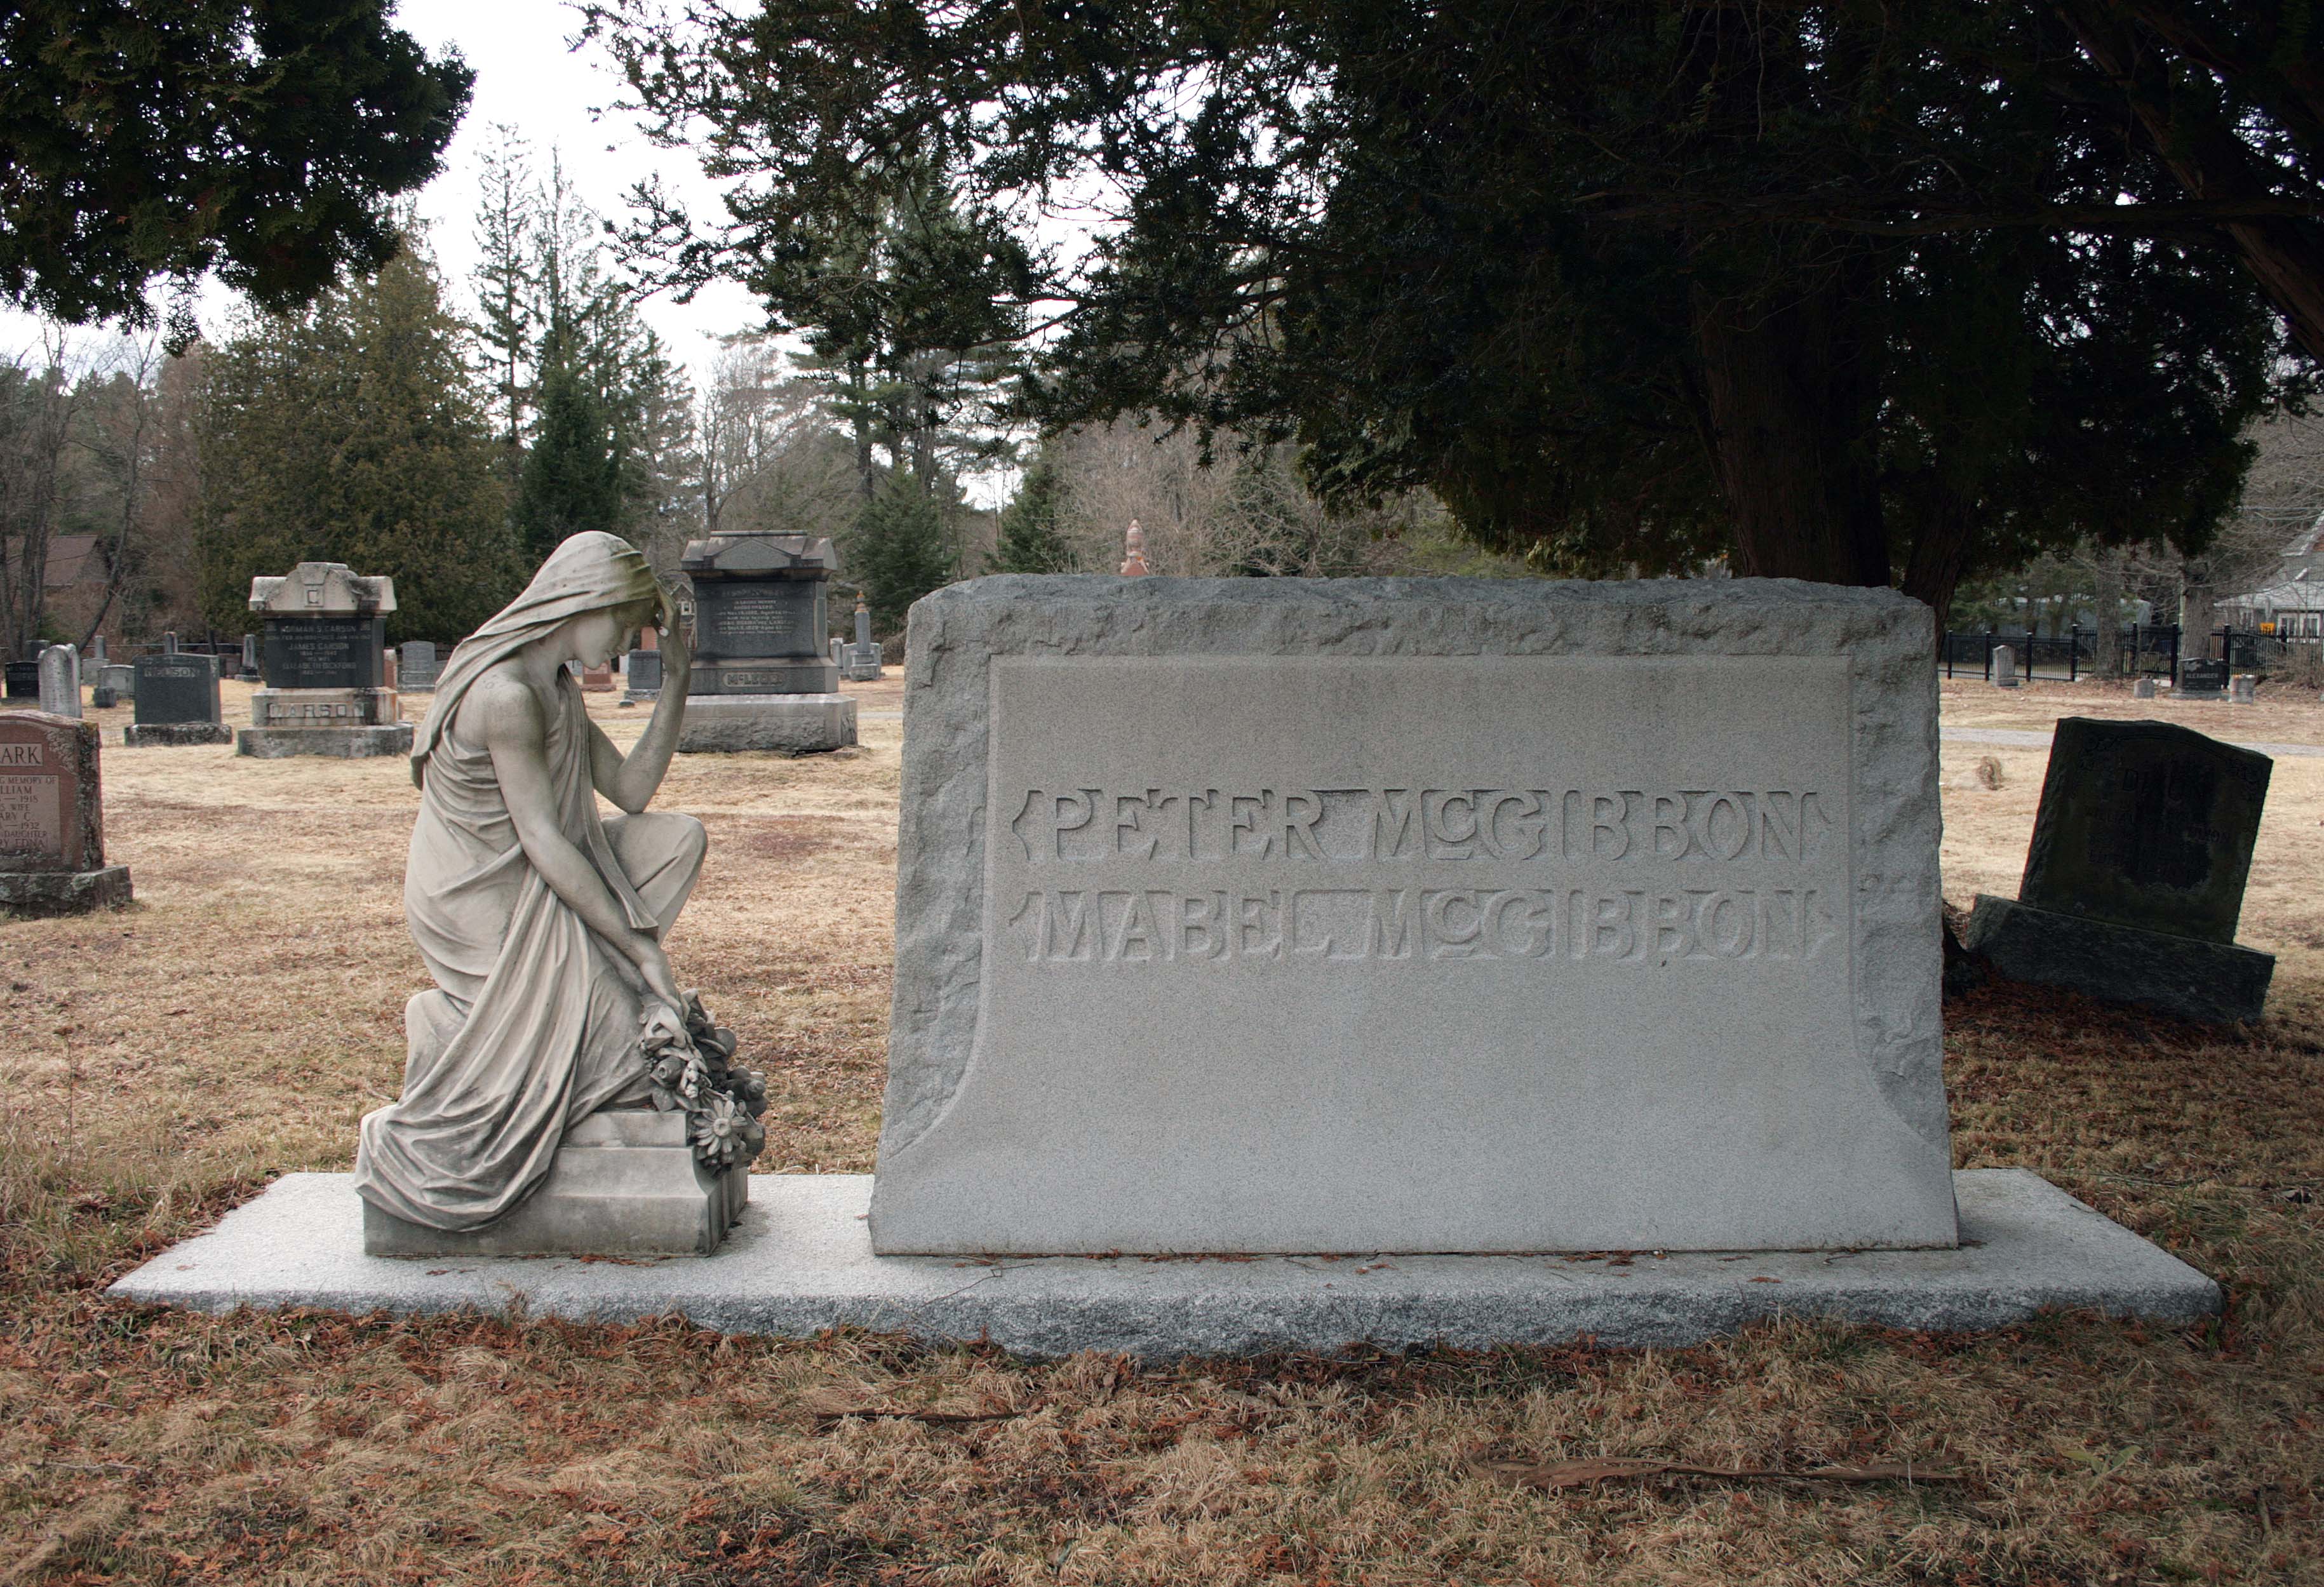
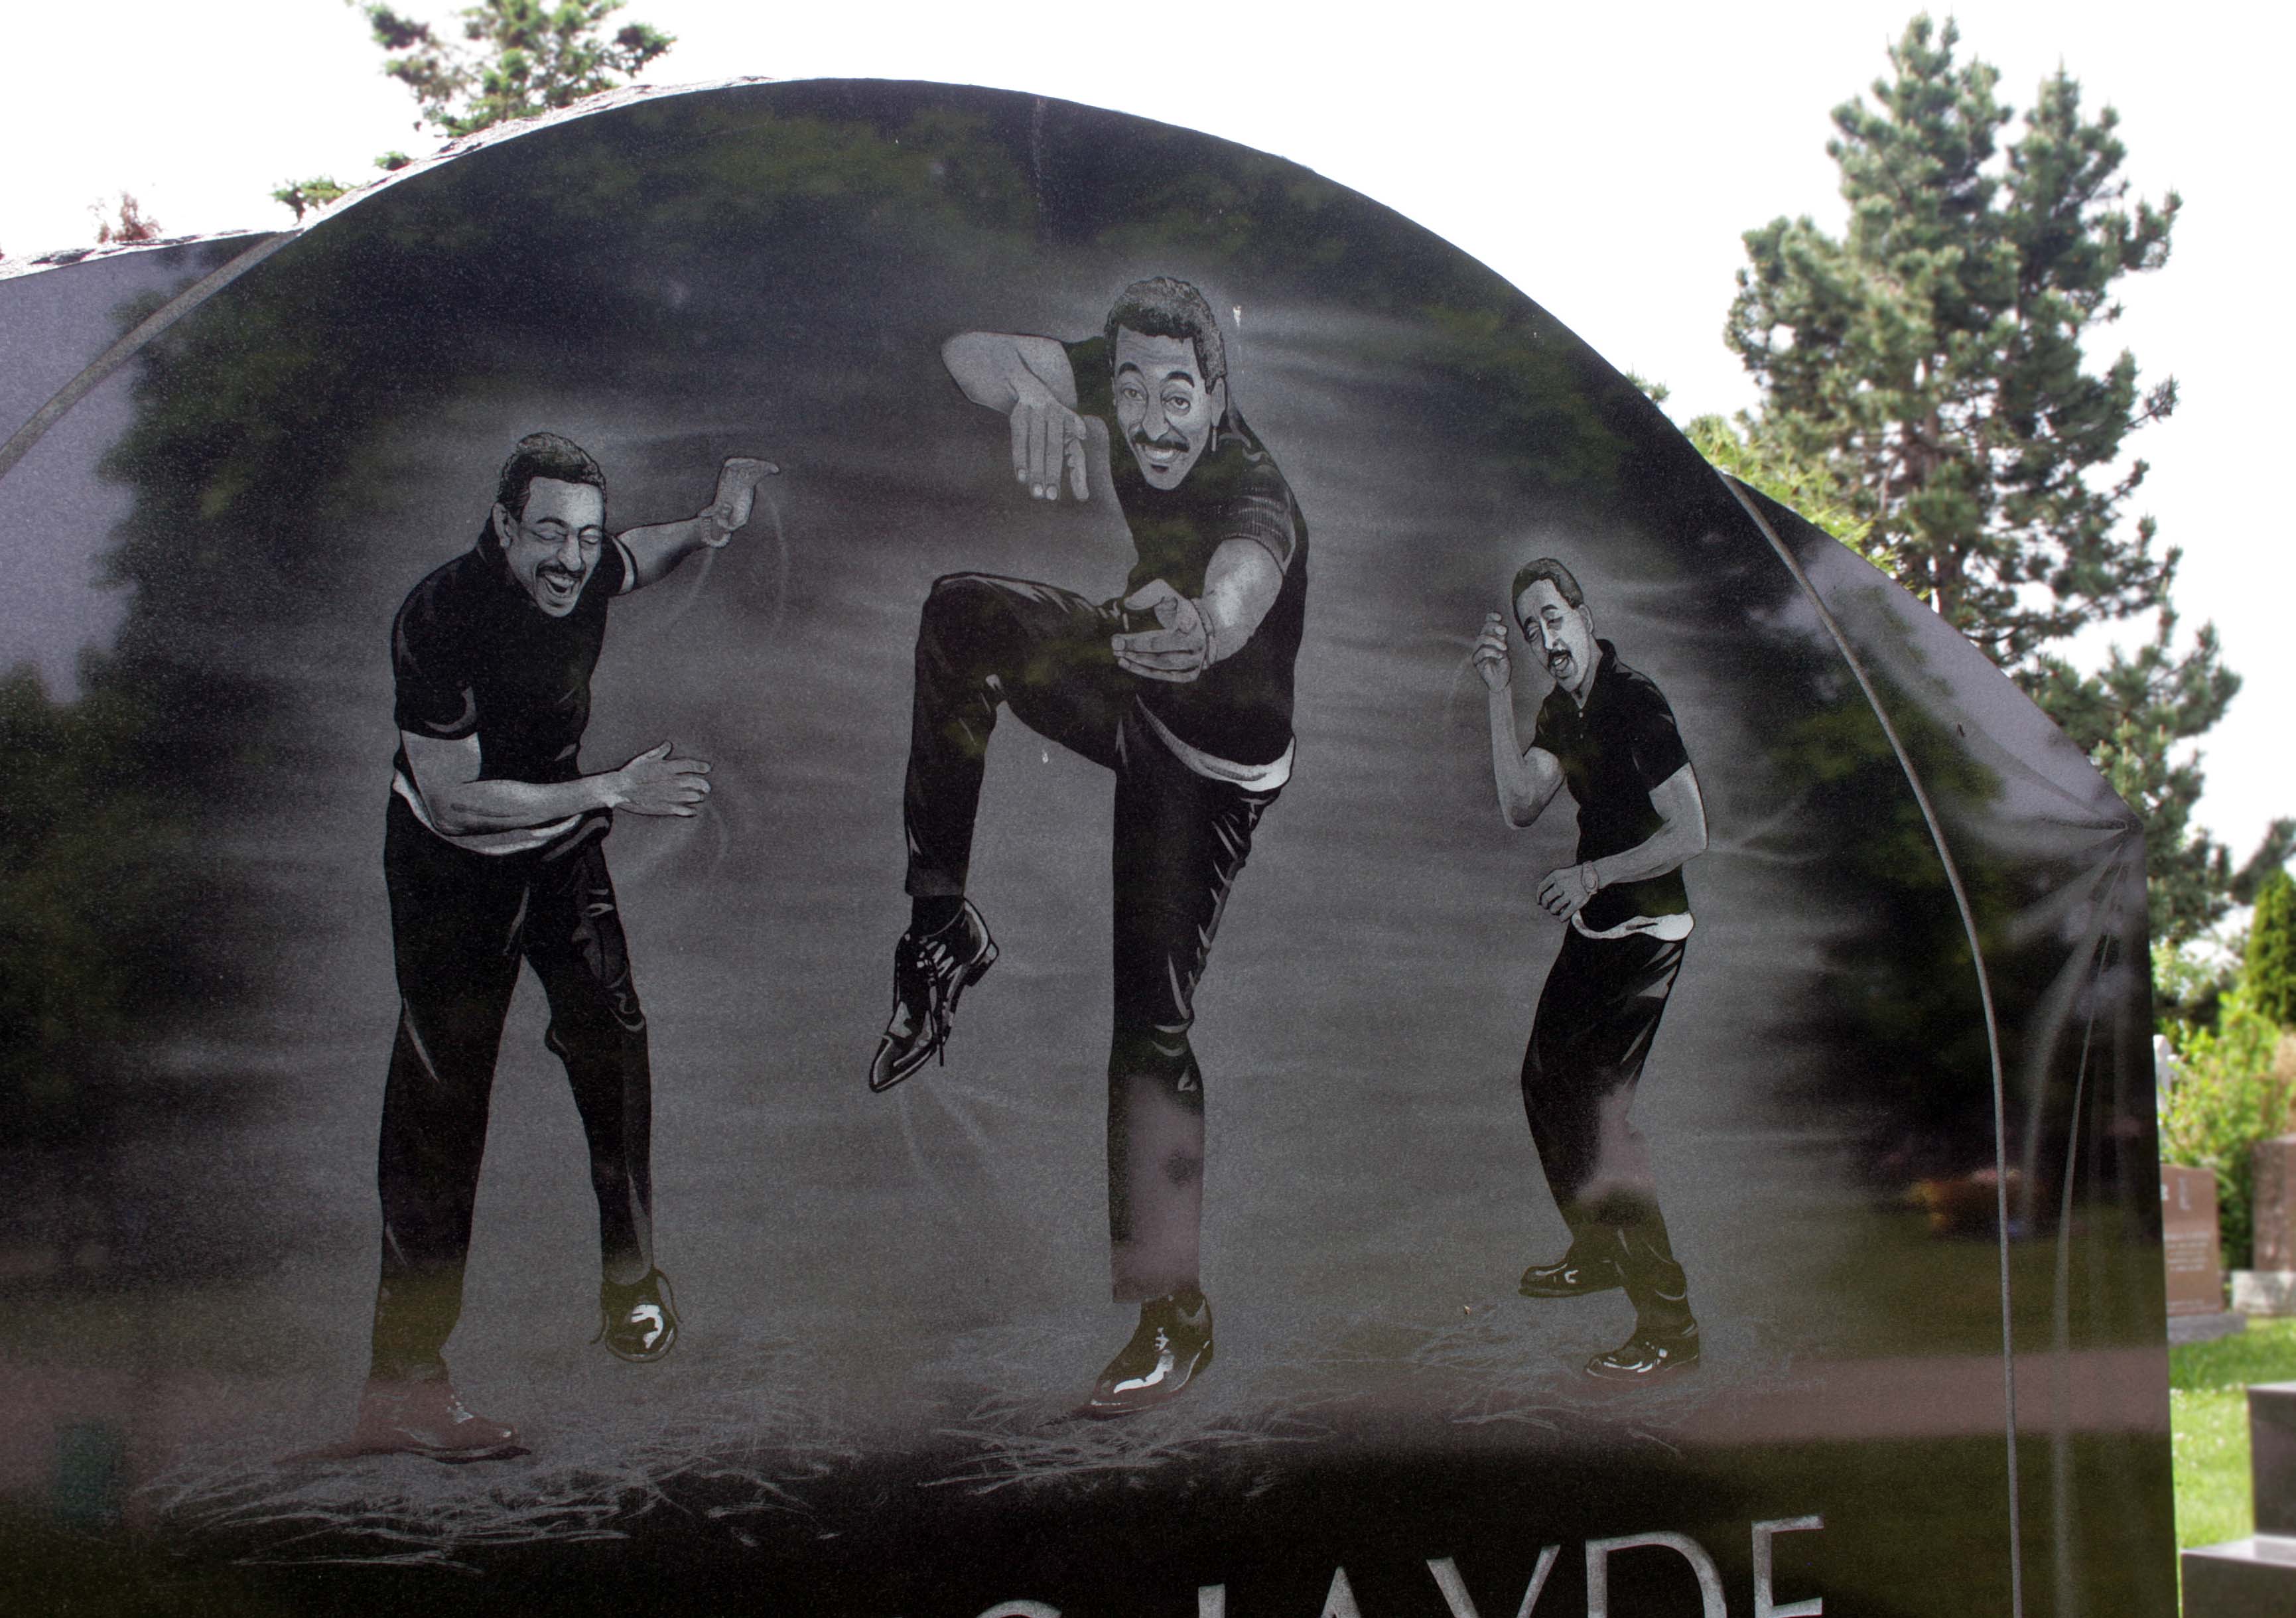
The Hines-Jayde gravestone is a beautiful monument, made from black granite. At the top of the stone is a sandblasted engraving of Hines dancing, framed by what looks like curtains on either side of the stone. He is depicted with a look of joy and happiness on his face. It’s a lovely representation of what he is best known for, and what was such a large part of his life. 

“Hines Jayde / Gregory Oliver / Hines / Feb. 14, 1946 / Aug. 9, 2003 / Together Forever / Negrita Maria / Hines Jayde / July 5, 1958 / Aug. 28, 2009 / So all sing in their festive dance. / “Within you is my true home” Psalms 87:7”

It was easy to tell that we were not the only ones who had made a trip to visit this gravesite. There were many grave goods left behind on the day we visited. These included stones, candles, and oil lamps. There was also a heel and toe plate placed at the base of the gravestone. These plates are mounted to the bottom of a shoe and used to tap dance. 

After paying our respects we wandered the cemetery a little bit, exploring the meandering paths. It’s a beautiful cemetery with its trees creating some beautiful dappled light across the gravestones. I noticed that there were many black granite stones, in some sections that were even the same style. 

I also noticed many oil lamps left at graves. It reminded me of the Jewish practice of leaving pebbles on top of gravestones. Some graves had only one of two oil lamps, while others had handfuls of them surrounding the stones. I can just imagine how beautiful they would look at night with all of the lamps lit up. 

You might be asking yourself how an American-born actor came to be buried in a Canadian cemetery. I had the same question. 

It looks like the reason is because of Hines’ fiancé Negrita Jayde, who is Canadian. A celebrity in her own right, Jayde was an athlete and an author. She was an award-winning professional bodybuilder from Toronto, Ontario, and wrote two books about the subject. She was also an actor, having starred in the action/sci-fi film Safety Zone in 1996.5

Although Hines and Jayde did not get the chance to get legally married before his death, Jayde did take Hines’ last name.6 When Jayde passed away six years, later in 2009 from cancer, she she was laid to rest beside him.

I’m very happy I was able to help one of my best friends pay her respects to one of her favorite actors. I’m also happy that I had the chance to pay my respects as well. Visiting famous graves is always an interesting experience because so often we feel so connected to them, even though we don’t know them on a personal level. TV and film actors, in particular, can feel like our best friends because of how invested we can get into their characters or their careers. So getting the chance to pay our respects at their gravestone can sometimes be a surreal experience.  

Have you ever visited a famous grave? I would love to read about your experience in the comments.

Thanks for reading!


References: 

  1. Gregory Hines | Britannica
  2. Gregory Hines | IMDB
  3. Gregory Hines | Wikipedia
  4. Saint Volodymyr Ukrainian Cemetery | Find a Grave
  5. Negrita Maria Truszyk Jayde | Find a Grave 
  6. Negrita Jayde Trivia | IMDB

Cemetery Recipes: Annabell’s Snickerdoodles

Today’s gravestone recipe is another one I have seen floating around on the internet pretty frequently. Since the success of last month’s cookie recipe, I thought it might be time to try another one, this time with some baking involved. 

I am pretty sure I have had a snickerdoodle before, but I don’t recall when. I asked my mother if she had ever made them before, and she said yes, quite often actually. So for today’s gravestone recipe, I try my hand at making Annabell’s Snickerdoodles.

This tombstone treat comes from the gravestone of Annabell R. Gunderson of Willits, California. Found in Willits Cemetery, this gravestone recipe takes up the entire backside of Gunderson’s grey granite gravestone.

Annabell Gunderson passed away at the age of 87, in 2007 after a battle against an unidentified illness.1 In life Gunderson was very active in her community, volunteering her time to multiple organizations. In particular with the St. Anthony’s Ladies Guild.1 Gunderson was known to especially love helping with the yearly enchilada feed—a fundraiser where trays upon trays of enchiladas are made and sold.1 

She is lovingly remembered as a great cook and for her hugely popular snickerdoodles. A recipe that now lives on, etched in stone.

Here is the recipe as engraved on the tombstone:

Annabell’s Snickerdoodles

Mix thoroughly:

  • 1 c shortening
  • 1 c margarine
  • 3 c sugar
  • 4 eggs

Sift together and stir in:

  • 5 1/2 c flour
  • 4 tsp cream of tartar
  • 2 tsp soda
  • 1/2 tsp salt

Roll (softly) into balls the size of small walnuts.

Roll in mixture of 6T sugar and 6 tsp cinnamon.

Place 2” apart on ungreased cookie sheet.

Bake at 375° for 8-10 min. or 400° for 6-8 min. until lightly brown, but still soft.

Secret is: Keep dough fluffy!

Making the Recipe

I spoke to my mom about making this recipe, and right away she was surprised at how much this recipe makes. She suggested I cut the recipe in half to make a smaller batch. Normally I do try to make the recipe as it is written, but I thought making half of this recipe would be more manageable for me in my small kitchen. After learning about Gunderson’s love of community and cooking, I think I understand why this recipe makes such a big batch. 

So after getting out my ingredients and figuring out the new measurements on my kitchen blackboard, I got started on mixing up a batch of Annabell’s Snickerdoodles.

The recipe is very easy to follow, and is very well written. I did have to soften my margarine and shortening in the microwave a bit so it would combine nicely with the sugar and then the eggs. I made sure not to heat them too much though, as I didn’t want to cook the egg at all. 

After that, I sifted in the dry ingredients till the mixture was well combined. I tried my best to not overwork the dough, keeping Annabell’s secret in mind.

Now came the fun part! 

I made sure to mix the sugar and cinnamon very well and put the mixture into a dinner plate so I had lots of surface to roll the dough around. To form the cookies, I pinched off small parts of dough, rolling them between my hands into a ball and then rolled them in the sugar and cinnamon mixture. Then I shaped them a little more with my hands before placing them on the ungreased cookie sheet.

I did flour my hands now and then while rolling the dough to try and stop it from sticking to my hands. I tried my best to space the cookies out evenly between two cookie sheets. I didn’t realize that the cookies would spread, so if I made them again, I would space them out a little more between multiple cookie sheets instead of only using two sheets.

I then placed both cookie sheets in the oven to bake at 375° for 10 minutes. I did a bit of washing up while I waited for them to turn a golden brown. 

Even though they did spread out a bit on the cookie sheet, it wasn’t terrible. After cooling on top of the stove for 10 minutes I was easily able to break them apart without ruining their shape too much. 

These cookies turned out amazing! I was a little bit daunted by the amount of work that had to go into these. But, it turned out to be not as intimidating as I thought, and the result are some of the best cookies I’ve ever tried—especially right out of the oven.

They are soft and buttery, sweet with a hint of cinnamon. I don’t think they will last too long in my house, as I couldn’t eat just one. I love how they turned out and will definitely be making these again!

This recipe would be great for someone looking for the perfect cookie for a bake sale or cookie exchange. They would also be a fun cookie to make in the kitchen with kids, as I am sure they would love rolling the dough around into the sugar and cinnamon. 

Have you tried this recipe before? Do you have a favorite snickerdoodle recipe? I would love to read about it in the comments!

Thanks for reading!


References:

  1. Annabell Gunderson obituary | The Ukiah Daily Journal

Cemetery Book Review: Country Churchyards

For this month’s cemetery book review, I wanted to talk about Country Churchyards by Eudora Welty. I first heard about this book through the Association for Gravestone Studies book club. I was not familiar with Welty’s work, but this book was a nice introduction. 

Eudora Welty is a Pulitzer Prize-winning author, known for her short stories and novels that are focused primarily on the American South during the mid-20th century. Some of her works include the short story Death of a Traveling Salesman and the novel, The Optimist’s Daughter1.

Welty had long wished to produce a photography book about country churchyards, and at the age of 91, this dream project came to fruition.2 In July 2001 at the age of 92, she passed away due to natural causes at her family home in Jackson, Mississippi. She is buried in Greenwood Cemetery in Jackson.1

Her grey granite gravestone reads:

“Eudora Alice / Welty / April 13, 1909 / July 23, 2001 / Daughter of / Christian & Chestina Welty / For her life, any life she had / to believe, was nothing but the / continuity of its love. / The Optimist’s Daughter”

Country Churchyards features 90 photographs captured by Welty in Mississippi. Accompanying these beautiful black and white photos are Welty’s memories and impressions of her time visiting these cemeteries in the 1930s and 40s. The book also features select passages about cemeteries and funerals from her short stories and novels.

My copy of Country Churchyards, purchased from Thrift Books is a well-loved library book from Topeka, Kansas. Even with the well-worn cover, and light water stains, the beauty of this book shines through.

The book is filled with gorgeous black-and-white photos showcasing unique gravestones, symbolism, and cemetery landscapes. The introductions by Hunter Cole and Elizabeth Spencer paint a lovely picture of Eudora Welty and her underlying passion for cemeteries. This, accompanied by excerpts of Welty’s writing, highlights how influenced she was by the heartfelt sentiment found in cemeteries.

I find cemetery symbols fascinating, and it’s interesting to see what common and unique cemetery motifs are found throughout the book. I often found myself comparing my area’s common symbols to those within the pages as I read through it. I did take my time with this book, really examining the photos and all of the details.

It’s a beautiful little book and a nice break from the heavier reading I have been doing lately. This is a book I would leave out on my coffee table.

Have you read Country Churchyards? Are you familiar with Eudora Welty’s work? I would love to read your thoughts in the comments. 

Thanks for reading!


I am always on the hunt for cemetery-related book recommendations. Please feel free to share yours in the comments. If you are an author and have a cemetery-related book you would like me to review, please reach out at hello@chantallarochelle.ca. I would love to hear from you.


References:

  1. Eudora Welty | Find a Grave 
  2. Country Churchyards | Goodreads

A Collection of Mourning Figures

One of my favorite things about cemeteries is the variety of symbolism you can find. After so many years wandering cemeteries, I have noticed some common motifs. An interesting thing I have also noticed is that depending on where you are in Northern Ontario, those common symbols will be different. I’d wager that the same could be said for other parts of the world as well.

On some recent cemetery road trips in Simcoe County and the Muskokas, I noticed many different forms of mourning figures. This symbol is not very common in my local cemeteries. So today on the blog, I wanted to look deeper at this symbol and share some of the examples I have come across so far this year.

Grief and mourning were popular grave motifs in the Victorian era. As death was such a big part of life in that time, it affected everything from fashion and jewelry to of course funeral practices and gravestones.1 

One of the many ways that grief was expressed was through the use of mourning or weeping figures. These figures were often depicted as kneeling or standing over a grave in a display of deep grief and mourning. Sometimes a mourning figure can also symbolize an early or sudden death.

Mourning figures are sometimes depicted holding wreaths or flowers. Flowers are thought to represent that life is fleeting, while the circular wreath is thought to symbolize eternal memory and immortality.2

Urns are another common Victorian grave symbol that sometimes accompanies a mourning figure. Borrowed from the Ancient Greeks who often cremated their deceased, urns represent the physical body being reduced to its barest elements as the soul ascends to Heaven.2

Sometimes weeping willows also appear with mourning figures. Weeping willows are strongly associated with grief and mourning, as their name suggests. They are another grave symbol adapted from the Ancient Greeks.2

I am always in awe and inspired by the art I find in cemeteries. It’s one of the reasons I love walking among the gravestones.

Have you come across any similar mourning figures in your local cemeteries? I would love to read about your findings in the comments.

Thanks for reading!


References:

  1. Cemetery Symbolism: What Do Those Mysterious Monuments Mean? | Laurel Hill
  2. Understanding Cemetery Symbols: A Field Guide for Historic Graveyards by Tui Snider

Stone Stories: Mattawa’s Master Painter

One of my favorite things to do on cemetery road trips is visit small local museums. They are often filled with beautiful antique artifacts as well as fascinating stories. Brimming with local history, they often lead me down interesting research rabbit holes. They are great places to learn about interesting local figures to seek out while visiting cemeteries.

For today’s stone story, I want to talk about another Mattawa local that I learned about while visiting the Mattawa Museum, Mattawa’s own Master Painter, Gordon Dufoe.

The Artist

Gordon Dufoe was born in Mattawa in October 1891. You could say that artistic talent runs in his family. His father would often draw animals to the delight of Gordon and his brothers.1 Although Dufoe never had any formal art training, he would go on to be known as the “Master Painter of the Ottawa Valley”.2

Dufoe did a tour of duty in Europe, during World War I, where he was sometimes moved from the lines and given orders to sketch the cathedrals, historic buildings, and other locations—to document them in case they were destroyed.3

In 1919, Dufoe returned to Mattawa and married Irene Leclaire. They would go on to have nine children together, seven sons and two daughters. Frank, the oldest of the Dufoe children, inherited his father’s artistic talent. Talent that was also passed down to Frank’s son Gordon, named after his Grandfather.2 

Dufoe eventually set up a home studio and began to paint professionally.1 His background as a trapper and guide shines through his work, which is largely focused on landscapes and animals. He had a beautiful eye for capturing the essence and movement of his subjects. 

The Mattawa Museum exhibit includes a Ricohflex – Model VI camera that was used by Dufoe. An avid photographer, he would often take photos that he would reference when creating his paintings. He also dabbled in building his own cameras, as well as building radios and telescopes.2 

His paintings can be found in North America, and around the world.1 Today, a painting can sell for more than Dufoe made in his lifetime as a living painter. He was known to give his paintings away or even throw them away if he was not happy with them.2 After his death in 1975, many of his works were donated to the Mattawa Museum2, and are on display for all to see.

In 1993, Dufoe’s family worked with Douglas Pollard at the Highway Book Shop to posthumously publish a book Dufoe had written. Canadian Animals I Have Known by Gordon Dufoe is a collection of stories from Dufoes life in the bush and contains many of his animal sketches.2 Today, the book is now out of print. 

Visiting the Cemetery

After visiting the museum, my mother and I made our way to the cemetery to pay our respects.

Dufoe passed away on March 3, 1975, at the age of 83. He is laid to rest in Saint Annes Cemetery beside his wife, Irene who passed away in May of 1977. Beside a large grey granite tombstone for both Gordon and his wife, stands a Canadian military grave marker, in honor of Dufoe’s military service. 

It reads: “ Gordon E. Dufoe / Private / 130 Battn. C E F / 3 March 1975 / Aged 83”

The Dufoe family plot is also the final resting place of Albert and Norman Dufoe, and Stella Dufoe Brunette, children of Gordon and Irene. 

It took my mother and I some time to find Dufoe’s plot as the cemetery is quite large. Saint Annes Cemetery, also known as Saint Annes Catholic Cemetery was established in 1883 and has approximately 2,246 memorials according to Find a Grave. The cemetery has not been fully photographed yet, and it is still an active cemetery. 

If we had not visited the Mattawa Museum before visiting the cemetery, we would not have known that this simple grey marker was the final resting place of one of Mattawa’s finest painters. 

The Museum and cemetery are not the only places in Mattawa where you can find a memorial to Dufoe. There is a park that sits between 10th and 11th streets that was dedicated to the local painter many years ago.1 In 2016, a new sign and a memorial bench that lists the names of all of his children was installed.4

The inscription on the memorial park sign reads: 

“Gordon Dufoe (1891-1975) an outstanding artist, craftsman, outdoorsman, soldier, family man, and friend is hereby remembered for the beauty and pleasure he brought to many and for his contributions as an exemplary citizen.”1

Thanks for reading!


References:

  1. Gordon Dufoe | Mattawa Museum
  2. Mattawa’s ‘Renaissance Man’ Remembered | Past Forward Heritage Limited
  3. Mattawa Park bench and sign honours artist | Bay Today
  4. Park bench will honour local painter | Bay Today

Cemetery Recipes: Chocolate Oatmeal Cookies

I have been craving something sweet and chocolatey for the last two weeks, so when I came across a gravestone recipe for chocolate oatmeal cookies, I knew I had to try them. The bonus is that it’s a no-bake recipe! 

This recipe is found on the gravestone of Bonnie June Rainey Johnson, who is laid to rest in Nome City Cemetery in Nome, Alaska. Johnson, also known as the “driver’s license lady”, worked for the Division of Motor Vehicles in Nome until she retired in 2000, after 30 years of service.1 She was also known for the sweetness of her no-bake chocolate oatmeal cookies.2 In interviews, Johnsons’ daughter Julie, has said that even the person who cleared the snow from their front yard made sure to do a good job because they would get payment in a batch of these cookies.2 Johnson loved spending time in the kitchen, cooking dishes that brought her family and friends together.1 

Bonnie Johnson was diagnosed with Alzheimer’s in 2004 and moved to Anchorage to be with her daughter in her final days. She passed away peacefully on May 8, 2007, surrounded by family.1 She was 71. Her famous oatmeal cookie recipe was inscribed on her gravestone in 2007, along with an image of a Cool Whip container—She was known to collect dozens of them!2

Here is the recipe, as written on the black granite obelisk:

Chocolate Oatmeal Cookies (No Bake)

Everyone’s favorite

  • 2 Cups of Sugar
  • 1/2 Cup of Milk
  • 1/4 Cup of Cocoa (Swiss Miss)
  • 1/4 Cup of Margarine (1 Stick)

Bring to a full boil in a saucepan

Remove from heat and let stand for 5 minutes

Then add

  • 3 Cups of Quick Oats
  • 2 Tablespoons of Peanut Butter
  • 2 Teaspoons of Vanilla

Drop on Wax Paper and Let Set Until Firm

Making the Recipe

This recipe is high on my list for being so easy to make. I had all the ingredients on hand, which was nice as I didn’t have to make an extra grocery trip. I did make one substitution though, as I didn’t have any Swiss Miss cocoa, only a generic store-brand version. 

The recipe is very straightforward to follow. There are also not many steps so it was a quick recipe to make. I added the ingredients in the order they were listed, making sure the margarine was melted and everything was well incorporated. I brought it all to a boil, making sure to watch it so it didn’t burn. I then removed it from the heat and let it sit for five minutes. 

During this time, I prepared two baking sheets with wax paper. I was not sure how big of a batch this recipe would make, but I thought two cookie sheets would be a good start.

After the five minutes, the chocolate mixture had a bit of a film on it. I didn’t stir it, but instead just added in the next ingredients. At this point I did change the order of things, adding the vanilla and peanut butter first. My thought was to melt the peanut butter to better incorporate it into the mixture. Then I added the quick oats, doing so a little at a time and mixing it well. 

All that was left to do was to drop the mixture onto the waxed paper and let them set. Using two spoons, I made my cookies a little too big on the first sheet. I only fit six cookies on a sheet. I spread them fairly thin but they were large. On the second cookie sheet, I tried to pull it back a bit and make smaller dollops, which I flattened out a little after all the remaining mixture had been spooned onto the sheet. The second cookie sheet had about 12 cookies on it.

Because I made one sheet of larger cookies, I opted to put that one in the freezer to set. The second cookie sheet I put in the fridge to set. After a couple of hours, I pulled out the tray in the fridge to give them a try.

They turned out so good! I was a little nervous, considering my problems with the last gravestone recipe I tried. But I think there was no way to mess this one up. I was afraid they were going to be too sweet, but the oatmeal helps cut some of the sweetness, I think. 

This is a great recipe, and I think will be my go-to the next time I need to whip something up fast the night before a family gathering, to share.

Have you tried this recipe? Do you have a favorite recipe that you would put on your gravestone? I would love to read about it in the comments. 

Thanks for reading!


References:

  1. Bonnie Johnson Obituary | Anchorage Daily News
  2. Tombstones with family recipes, from Alaska to Israel | The Observatorial

Cemetery Book Review: Unusual Gravestones

One of my favorite things about visiting cemeteries is that you never know what you are going to find, and that’s exactly what this month’s cemetery book review is all about. 

Unusual Gravestones by Martin and Claire Nicholson is a collection of unusual and interesting gravestones that this couple has photographed over the years. The Nicholson’s seem like kindred spirits, as they both enjoy photographing and documenting cemeteries and have been doing so for quite some time. They have added an interesting element to their graveyard wandering, they call it “competitive grave-hunting”. 

Here is a synopsis of the book from Goodreads

“The authors have viewed millions of gravestones, and are offering readers a selection of the rare and unusual gravestones that they have seen, with full-color illustrations. Each category of type of gravestone, age of person, cause of death, rare names, and errors found on gravestones are given a points score to indicate rarity.”

Published in 2015, this small softcover book is a collection of Martin and Claire Nicholson’s Cemetery Project. They began this project looking specifically for centenarians, those who reached the age of 100 years or more. Along the way, they discovered other unique gravestones. They separate their finds based on age, marriage, cause and manner of death as well as shape and material of the gravestone among other things. They have assigned a point system to all of these identifiers. It’s interesting to note that gravestone symbols don’t feature in their point system, as they seem to focus on epitaphs more than anything else. 

It’s a pretty interesting concept and not something I can say I have ever thought of doing. The book features color photographs that highlight some very unique gravestones. Sometimes only showing the relevant engraved epitaphs. 

The Nicholsons seem to be based in the UK, as this book and their accompanying website highlight many cemeteries and gravestones in that area. I found it interesting to see what kind of gravestones can be found in that part of the world. I thought it was a nice touch that they included a list of helpful tips for grave-hunting. However, I will note that I always prefer overcast days for cemetery visits as a photographer.

Although I think this book could use a little design polish, it is a fun little read and could be a good way to add a little competitive edge to your outings. The point system is well laid out in the book, with accompanying examples. It would be easy to adopt it for yourself or use it as a starting point for developing your own system. As the authors note in the introduction, some graveyards will have more commonalities than others, and I have found that the same can be said for whole geographic locations.

What do you think? Is this something you already do on your cemetery visits? Will you be adding Unusual Gravestones to your reading list? I would love to read your thoughts in the comments. 

Thanks for reading! 


I am always on the hunt for cemetery-related book recommendations. Please feel free to share yours in the comments. If you are an author and have a cemetery-related book you would like me to review, please reach out at hello@chantallarochelle.ca. I would love to hear from you.

Celebrate with a Cemetery Terrarium

Did you know that May is Cemetery Appreciation Month?

I first found out about this observance in 2021 when I saw similar posts circulating on social media from others who frequent cemeteries. I have been celebrating ever since! 

I’m not sure when this celebratory month was first recognized. But, I did learn that in May 2009, the Iowa Governor proclaimed the month of May to be Cemetery Appreciation Month, to honor the importance of cemeteries:

“Whereas, pride and respect for our pioneers leads to an interest in and concern for the future. It is with this thought in mind that we dedicate this month to the care of our pioneer cemeteries:”1

Many others have since followed suit, with other counties, historical societies, and even cemeteries making similar proclamations that apply to all cemeteries. 

In the past, I have celebrated by making myself a bucket list of fun things to do that can be completed during the month. Last year, I created a set of 4 Cemetery Bingo Cards (PDF) that you can print out and take with you on your next cemetery visits.

This year I wanted to do something a little different to celebrate, by making a little cemetery terrarium that I can hopefully keep year-round. 

A cute little reminder of the places I love so much.

A true terrarium is a miniature, self-sustaining garden ecosystem that is usually contained in a small sealable glass jar. Placed in the sun, it becomes self-watering through a cycle of condensation and evaporation. Once sealed, there should be no need to re-open the jar again, although it doesn’t hurt to give it a little spritz if needed.

Things you’ll need:

  • a sealable glass container
  • plants (moss, ferns, etc.)
  • gravel or lava rock
  • sand or activated charcoal
  • mesh screen
  • soil
  • cemetery decor

Tools:

  • tweezers
  • spray bottle filled with water

How to make a Cemetery Terrarium

First things first, you will need to choose the container that will house your little cemetery. 

Look for a sealable glass container that has a wide mouth. This will make it easier to build your cemetery within it. 

I found my container at a local thrift store, but you can also look for the perfect container at your local dollar store as well. If you are going for a specific look, you might get lucky at Michael’s Craft Store, but they can be on the more expensive side, so if you do go that route make sure to check their website for a coupon.

Next, you will need some plants! 

To best mimic the look of a cemetery I am going with moss, but you can go with whatever you like best. Keep in mind that a closed terrarium creates a high-humidity environment, so you want to choose plants that will do well in that setting. Ferns and mosses both do well in a terrarium. 

The benefit of using moss is the ability to build up your little landscape in chunks, to create a more natural-looking terrain. This will come in handy when placing your gravestones and other decor as well.

Now we can start building our terrarium from the bottom up.

First, add about an inch of gravel or lava rock to the bottom of your glass container. This layer will act as your drainage, creating space for any excess water. This will also help prevent root rot. 

Next, fill in the spaces between the gravel with sand or activated charcoal. This will add an extra layer of filtration. 

After that, lay the mesh screen on top. This screen will allow water to pass through but will stop the soil from mixing into the drainage layer. This will also create a barrier to slow down roots, and help prevent root rot. 

Now that we have a strong foundation for our terrarium, it’s time to start adding the soil. 

The type of soil you use is up to you. There are soil mixes made specifically for terrariums, such as ABG mix or Terrarium mix, but potting soil can work just as well. 

You want to add enough soil to contain the plant roots comfortably.

To add dimension to your landscape, and if you have the space in your container, you can create different elevations by adding a slope or valley into your soil layer.

Now it’s time to start building our miniature landscape. 

To start, give the soil a light misting. This will make the soil a bit easier to work with. Now you can start arranging your plants. 

Break apart your moss into manageable chunks. This will help make placement easier, as well as working around your gravestones and other decor. 

Using the tweezers to place and build up my moss, I incorporated some miniature gravestones and a coffin to flesh out my cemetery.

Add moss until all the soil is covered.

I used gravestones and coffins from the Lemax Spooky Town Collection that I purchased from Michaels a few years ago. These are pre-painted and stand about 1 inch tall. But there are other cemetery sets out there for purchase, some that are 3D printed and unpainted so you can customize your cemetery. 

For an added touch, you can add small branches to your terrarium to create the illusion of trees. 

Now that your cemetery is ready, it’s time to give it one last watering before sealing it up. Give your cemetery a light spray, with just enough water to make the soil damp.

Then go ahead and put the lid on, to seal your container, and admire your new miniature cemetery!

Your new mini cemetery should be pretty self-sustaining, but to get the most life out of your terrarium, make sure to place your terrarium somewhere that gets plenty of bright, indirect sunlight. Infrequent direct sunlight won’t hurt it, but too much direct sunlight can burn your plants. If you notice your cemetery looking too dry, or your plants look wilted—give your terrarium a light watering, making sure not to soak it. 

I hope you enjoyed this little tutorial on how to make your own cemetery terrarium. I had a lot of fun creating mine and putting this little how-to together. It was a little out of my comfort zone, but I had fun experimenting and exploring the world of terrariums.

I found it particularly fun designing my cemetery landscape and thinking about what my favorite elements of a cemetery are and trying to incorporate that into my final design. 

I can’t wait to see what you create! Make sure to tag me on Instagram and Facebook.

Happy Cemetery Appreciation Month! 

Thanks for reading!


References:

  1. May is Cemetery Appreciation Month | Newton News

Stone Stories: The Abandoned Highway Bookshop

When I was a child, my family often made trips to Quebec to visit extended family. My father loved to use the shortcut through Field, as it cut about 30 miles off our five-hour drive to Val d’Or. We always stopped for a meal at the McDonald’s beside Ms. Claybelt, the 12-foot-tall Holstein cow. 

On the way back from our family visits we would add another stop to our route, which also became a road trip tradition. That was stopping at a small unassuming Book Shop that sits beside Highway 11. 

I have many fond memories of this little highway book shop, that today sits abandoned. Just like the many books that have sat on the now neglected shelves, the Book Shop has its own interesting story to tell.

The Highway Book shop

When Douglas Pollard opened his small print shop, called Pollard Press in 1957, I don’t think he ever imagined how big it would become. What started as a small commercial print shop in his garage, printing general office stationary eventually turned into a Northern cultural landmark.1

The story goes that one of Pollard’s customers asked to barter used books instead of cash to pay his bills. From then on the demand for books became greater and the shop expanded many times over the years to accommodate the growing collection of books.1 

Being originally a print shop, it was a natural move for Pollard to start printing and publishing books in the 1970s2. 467 original titles were published through the Highway Book Shop, focusing on local history and Canadian literature.1

What started as a 20’ x 25’ wooden building eventually expanded into a 10,000 square footprint, consisting of building add-ons and even three highway trailers that were used to store nothing but books.2 No wonder so many people made it a mandatory stop in their travels, sometimes just to experience the sheer size of its collection. 

I remember as a young girl getting lost among the stacks of books. It was so mind-blowing to me that the staff could find anything in that sea of books. However, the inventory was well maintained and kept very up-to-date. The Book Shop even maintained a list for those looking for specific titles. You could add your name to the list with your desired title and eventually, you might get a call that your book was found. Naturally, this could take some time, even years!2 

Pollard, and his first wife Jean Ririe Hope, spent a lot of time at book fairs and conventions, always on the hunt for good books to add to their shop. Pollard even purchased lots of discarded Library books, that were sometimes hit-or-miss for quality. 

After Pollard’s first wife passed away, he eventually remarried and brought his second wife into the fold of the Highway Book Shop. Mary Lois Williams was a Librarian with a Master of Library Science from the University of Toronto. She left the Librarian life trading it to work in the Book Shop when she married Pollard in 1986.3  

After Pollard died in 2009, Lois worked to keep the Book Shop running. It was a valiant effort, but she ultimately decided to close the shop in 2011. At 87 years old, her heart was just not in the same way anymore.

Visiting Cobalt

I visited Cobalt in October of 2022 with my mother. We wanted to take advantage of the fall colors and visit some local historical sites. We also wanted to visit Douglas and Lois Pollard in the cemetery, to pay our respects.

We spent most of our time in Cobalt visiting the Heritage Silver Trail, a self-guided trail system that takes you to 14 locations throughout the small town, that highlights the history of the silver mining rush. Unfortunately, when we visited, a lot of places were closed. This was also the case of the bookstore we had hoped to visit, White Mountain Publications.

White Mountain Publications was high on our list to visit as it houses some books that were rescued from the Highway Book Shop after it closed. I was hoping to speak to someone about how many books were rescued and if there were plans to rescue more. White Mountain also published a book that I was hoping to purchase on this trip, called Highway Book Shop: Northern Ontario’s Unexpected Treasure written by Lois Pollard. I ended up purchasing the book through White Mountain’s website instead. 

Of course, there were many cemetery stops planned for this trip, but the one we wanted to visit most was the Cobalt Veterans Cemetery. This cemetery is located in Haileybury, a small town adjacent to Cobalt. The cemetery sits beside two other cemeteries; directly beside Mount Pleasant Cemetery, and across the road from the Haileybury Catholic Cemetery. 

The Cobalt Veterans Cemetery is the smallest of the three, although Find a Grave lists 332 memorials. I would not have thought there were that many laid to rest there based on the cemetery’s small size. It did make finding the Pollards less of a challenge. 

Douglas Pollard passed away on November 25, 2009, at the age of 84. His obituary states that he passed away suddenly at Temiskaming Hospital4, but in her book Highway Book Shop, Lois briefly touches on that fateful night. Like any other normal day, after closing time Pollard went upstairs to retire for the night, as they lived in a small apartment above the book shop. When she followed him upstairs, only ten minutes later, she found that he had “quietly passed away”. Doctors confirmed that he had died of cardiac arrest.2 

Douglas is laid to rest beside his second wife, Lois Pollard who passed away on January 3, 2020, at the age of 98. Their gravestone reads: “Pollard / Douglas C. Pollard. C.M. / March 18, 1925 — Nov. 25, 2009 / Beloved Husband of / Mary Lois Williams / July 21, 1922 — Jan. 3, 2020”

Douglas’s first wife, Jean Pollard is laid to rest in Valleyview Cemetery in New Liskeard. Jean passed away in October of 1979, unexpectedly on the operating table during a planned second open-heart surgery.2

The Book Shop Today

The Book Shop closed its doors forever on May 29, 2011. In 2012 it was purchased by new owners, but the Book Shop never re-opened.5 Rumour has it that the inventory of approximately one million books1 was left behind on the shelves. As noted above, White Mountain Publishers did rescue some of the books, but is it true that the large majority were left behind? 

When we visited the Highway Book Shop on our way back home from visiting Cobalt, we took some time to walk around the building outside. The large sign that stands by the road that once welcomed visitors is slowly deteriorating. The building facade has peeled and faded over the years, and the grass is now growing wild. 

We were hoping to catch a glimpse of the stacks of books inside, instead, we got a whiff of the strong musty smell of old books. Depending on where you stand outside the front of the building, you can catch that unmistakable smell. I can just imagine what it must smell like inside the building.

While touring the grounds we chatted about our memories of visiting the Book Shop. My mother remembers speaking with Lois on our many visits over the years. We also talked about the books—about all the books that were left behind, and wondering about what types of books we could find given the chance. Both of us are not brave enough to cross into urban exploration territory, but luckily we are not the only curious ones.

The good people over at Freaktography have ventured inside to document what the Book Shop looks like today and prove once and for all that the rumor is true, they did leave the books behind. You can watch their video Exploring a HUGE Abandoned Book Store over on their YouTube channel

Their video and photos show a time capsule, and books in rows upon rows of bookshelves for as far as the eye can see. It looks just like I remember. I am not the only one who has tried to imagine what an abandoned building full of molding and rotting books might smell like. The folks at Freaktography have been asked the question before:

“I have been asked by people, “What did it smell like in there?”, it smells exactly like you would think it does – like old books. It has warm, thick air and the rows upon rows of books give a muffled sensation when talking, there is no echo and it is eerily silent.”6

I can only imagine how surreal it would be to walk through those stacks again. Watching the walk-through video does make me a bit sad though. So many books left behind. I wonder what unique and rare finds there might be, what treasure could be found. I mean a lot of those books might be dated and useless now, such as the maps and tech manuals. But just imagine what old and out-of-print finds there might be buried in there as well. 

Maybe one day someone will be given the go-ahead to slowly pour through those lost tomes, and bring some of them back into the light. I know I would love to, given the chance. 

It was really interesting looking into the backstory of this abandoned landmark, and a piece of my childhood. Learning about the lives and passions of the people who brought the Book Shop to life highlights the fact that there are so many interesting stories out there. 

Thanks for reading!


References:

  1. A Short History | Highway Books
  2. Highway Book Shop: Northern Ontario’s Unexpected Treasure by Lois Pollard | Book
  3. Mary Lois Williams Pollard | Find a Grave
  4. Dr. Douglas Charles Neil Pollard | Find a Grave
  5. Home | Highway Books
  6. Exploring a HUGE Abandoned Book Store | Freaktography Youtube Channel

Cemetery Recipes: Kim’s Carrot Cake

I don’t know why, but Spring often makes me think of carrot cake. So when I was trying to decide which recipe I should make this month, the answer was pretty obvious. Maybe it’s because Easter often falls in April, or because Easter reminds me of picking fresh carrots from the garden when I was a kid. Either way, it’s always a good time to bake a cake. 

So for this month’s gravestone recipe, I wanted to try my hand at making Kim’s carrot cake. This recipe comes from the gravestone of Kimette Lee DeCota, from Cape County Memorial Park Cemetery in Cape Girardeau, Missouri. Kim passed away in August of 2014 at the age of 57.

Reading her obituary on Find A Grave, you will see many references to food and cooking. It describes a passionate woman who loved her family and community. Kim was very active in the church, cooking meals as well as helping her parents in the kitchen among other things. 

I would love to know more about the recipe inscribed on her gravestone. Was this her go-to recipe? Maybe her signature dessert? I may never find out, but it warms my heart to know that someone so passionate about cooking can continue to share their passion from beyond the grave.

Here is the recipe, as written on the gravestone:

Kim’s Carrot Cake

  • 3 cups unbleached all-purpose flour
  • 3 cups sugar
  • 1 teaspoon salt
  • 1 tablespoon baking soda
  • 1 tablespoon ground cinnamon
  • 1-1/2 cups corn oil
  • 4 large eggs, lightly beaten
  • 1 tablespoon vanilla extract
  • 1-1/2 cups shredded coconut
  • 1-1/2 cups shelled walnuts, chopped
  • 1-1/3 cups puréed cooked carrots
  • 3/4 cup drained crushed pineapple
  1. Preheat oven to 350F. Grease two 9-inch springform pans.
  2. Sift dry ingredients into a bowl. Add oil, eggs, vanilla. Beat well. Fold in the walnuts, coconut, carrots, pineapple.
  3. Pour batter into the prepared pans. Set on the center rack of the oven and bake until the edges have pulled away from the sides and a cake tester inserted in the center comes out clean, 50 minutes.
  4. Cool on a cake rack for 3 hours. Fill and frost the cake with the cream cheese frosting.

Cream Cheese Frosting

Doubling the frosting recipe is highly recommended.

  • 8 ounces cream cheese, at room temperature
  • 6 tablespoons unsalted butter, at room temperature
  • 3 cups confectioners’ sugar
  • 1 teaspoon vanilla extract
  • Juice of 1/2 lemon (optional)
  1. Cream the cream cheese and butter in a mixing bowl.
  2. Slowly sift in the confectioners’ sugar and continue beating until ingredients are fully incorporated. The mixture should be free of lumps.
  3. Stir in the vanilla, and lemon juice if desired.

Serve with love.

This recipe is very easy to follow and has very detailed instructions. I found it interesting that the recipe takes up almost all of the room on the gravestone. On the left hand of the stone is an ingredient list and directions to make the cake, while the right-hand side has the ingredient list and instructions to make the frosting. I love that the first note is to double the frosting recipe. I like the way Kim thinks! 

I made this recipe in two parts, first baking the cake and then frosting the next day. For some reason, I only have one spring-form pan so I had to bake the layers one at a time. I really need to rectify that. After the first cake layer was done baking, I took it out of the pan and sat it on a wire rack to cool. I wiped down and reassembled the spring-form pan and poured in the last of the batter. I then put that in the oven to bake.

The recipe calls for the cake to be cooled for three hours. After I took the second layer out of the oven it was fairly late in the evening, so I placed both layers in the fridge to cool overnight.

After work the next day, I set to work making the frosting. I took the cake out of the fridge and placed it on the table to warm up a bit while I mixed the frosting. I know the recipe recommends doubling the frosting, but I found that one batch made more than enough frosting for me. 

Although the instructions were incredibly easy to follow, I do think I messed up a little bit. I baked each cake layer in the oven for the instructed 50 minutes, but didn’t check on them at all. 50 minutes turned out to be too long for my oven; I think I over-baked the cake. It wasn’t burned or anything like that, but the edges became very hard and crisp. So hard that I had trouble cutting the cake when it came time to try a piece. If I were to make this recipe again, I would start checking on the cake at about the 30-minute mark and doing a toothpick test to see if it’s cooked through. 

I also think I didn’t frost the cake properly. I think I might be a bit rusty at making cakes! I was afraid to use up too much frosting in between the cake layers so I frosted that section sparingly. I shouldn’t have been worried though, as I had way too much frosting left over. 

I hoped that the frosting would help moisten and soften the cake a bit, but it’s still a bit hard to cut. Other than the human error on my part, this recipe turned out great. This delicious cake is sweet, and the shredded coconut adds a nice flavor to the mix. I would definitely make this one again! 

Have you tried this recipe? I would love to hear how yours turned out, and if you have any baking tips for me. 

Thanks for reading!