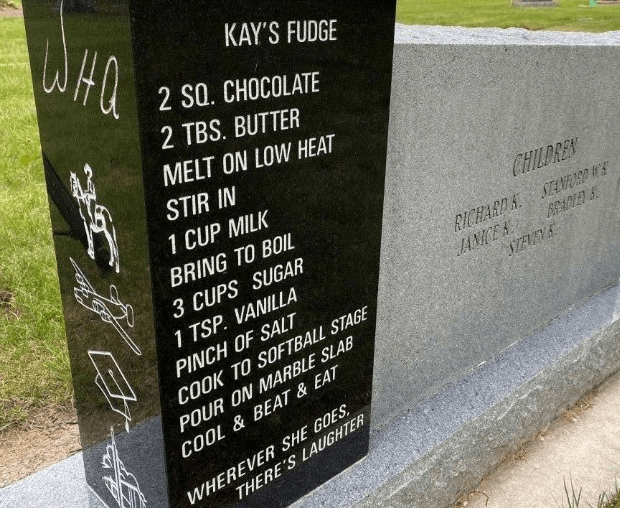
I had such a fun time trying out Kay’s Fudge recipe a couple of months ago, that I wondered what other cemetery recipes were out there. I was pleasantly surprised at the handful of recipes I found.
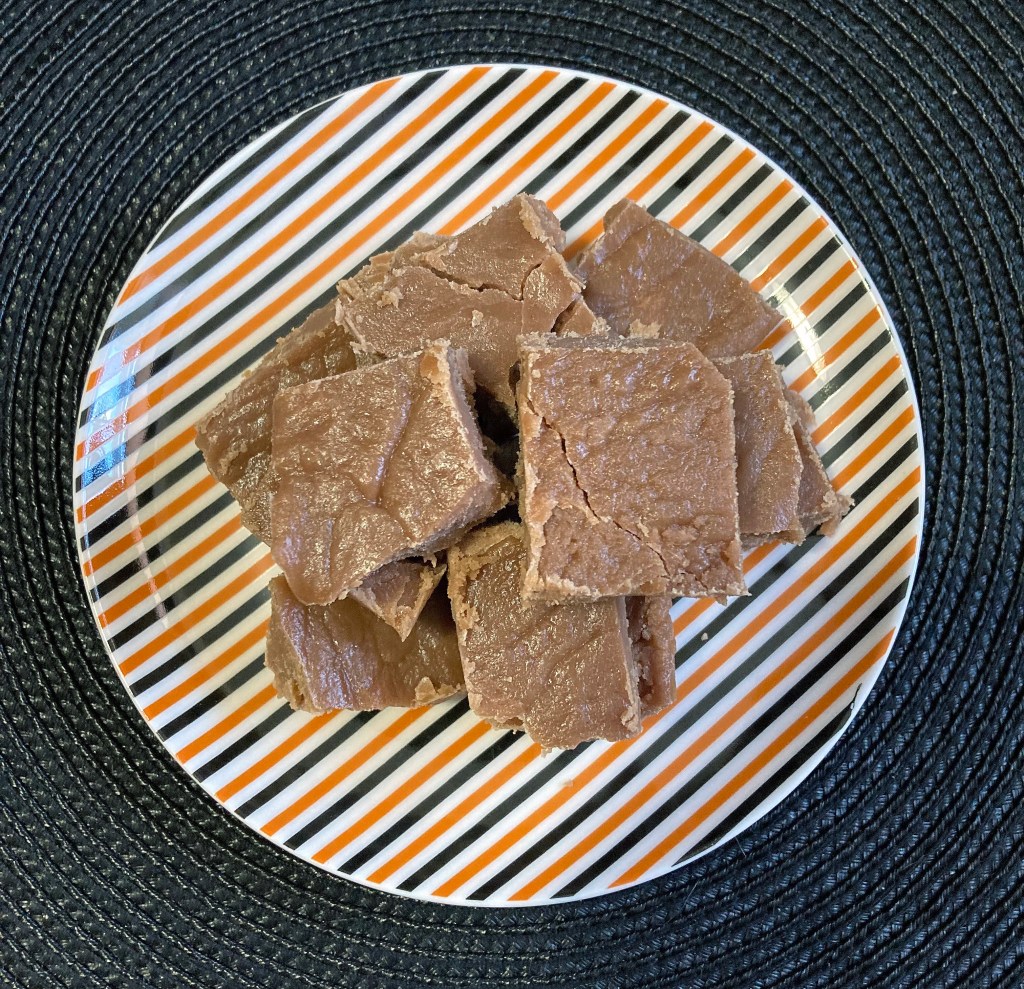
Today I wanted to try my hand at making Connie’s Date & Nut bread. 100% Good stuff – 0% Bad Stuff. Sounds delicious to me!
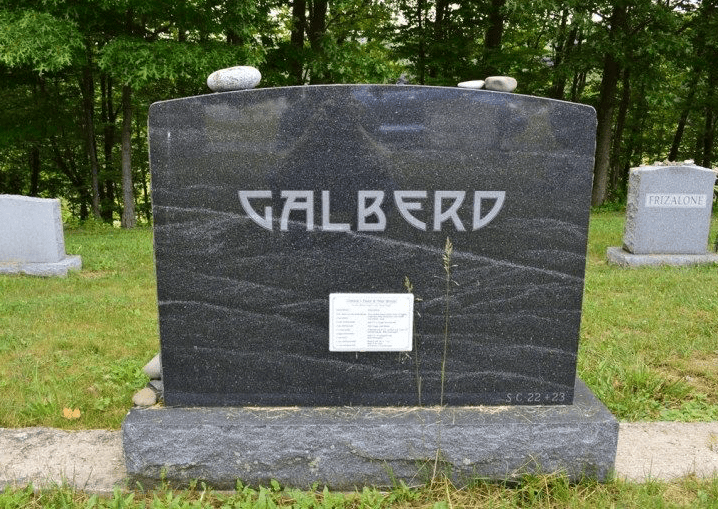
Grave of Constance Galberd, Photo by Find a Grave contributor P. Jill Moore. Photo used with permission.
This tombstone can be found in the Cemetery of the Highlands in Highland Mills, NY. Instead of the recipe being engraved on the stone, it’s printed on a small white plaque that is attached to the stone. The headstone belongs to Constance Galberd.
From reading Connie’s obituary, she was a very busy woman. Constance was a retired Registered Nurse at Cornwall Hospital in New York, a member of the Woodbury Community Ambulance Corps, and a member and Trustee of the Woodbury Historical Society. She has three children, a daughter, two sons, and four grandchildren. I think it’s safe to say she was also a great baker with a great sense of humor. Constance passed away in September 2008, at the age of 80.
You can view her memorial page on Find a Grave.
I love the idea of putting a well-loved family recipe on a tombstone. It ensures the recipe will be passed down through the generations, and that a piece of them will be remembered.

Recipe plaque on the grave of Constance Galberd, Photo by Find a Grave contributor P. Jill Moore.
Photo used with permission.
The recipe reads:
Connie’s Date & Nut Bread | 100% Good stuff – 0% Bad Stuff
Ingredients:
- 8 oz. dates cut into small pieces
- 1 cup raisins
- 2 cups boiling water
- 2 tsp. baking soda
- 1 1/2 cups sugar
- 2 eggs, well beaten
- 4 cups flour
- 2 tsp. baking powder
- 1/2 cup chopped nuts
Directions:
- Pour boiling water (where 2 tsp. of baking soda have been dissolved) over dates and raisins. Cool.
- Add 1 1/2 c. sugar and mix well.
- Add 2 eggs, well beaten.
- Gradually mix in 4 c. of flour and 2 tsp. of baking powder. Beat thoroughly.
- Add 1/2 c. of chopped nuts. Beat thoroughly.
- Bake at 350 for 3/4 – 1 hr.
- Bake in tin cans.
- One batch = 13 small cans.
This recipe is pretty easy to follow. I have made banana bread before and found the process very similar. The directions are very clear, although I was a little uncertain of how long to let the boiling water over the dates & raisins cool. I spoke out loud to Connie while I mixed my ingredients and waited for the water to cool. When the water was no longer steaming, I mixed in the sugar and continued with the recipe.
I was a little thrown off by the last 2 directions, about baking in tin cans. I had to look that up. I found out that baking in tins cans, like vegetable or soup cans, was used for baking during the depression. The end result would be little round cakes or loaves of bread. I would have loved to be authentic to the recipe, but I didn’t have any empty tin cans to wash out and recycle for baking. It is something I would like to try in the future though. For this recipe, I used 2 loaf pans and split the batter between the two.

My kitchen smelled amazing while these were baking! I had to have a piece when it came out of the oven, and I was not disappointed. It’s a dense bread, similar to a fruit cake. Connie is absolutely right when she says “100% Good stuff – 0% Bad Stuff“. I am really happy with how they came out. After letting them cool on a cooling rack, I popped them out of the pans and wrapped them up. I always love to share my baking, and being able to share Connie’s recipe too feels like a sweet way to remember her.
Will you be trying Connie’s Date & Nut bread? Or have you found another tombstone recipe I should try? Tell me about it in the comments.
Thanks for reading!
References:
- If You Love a Recipe Enough, You Can Put It on Your Grave | Vice
- The Recipe Headstone | Serendipity Tree Genealogical Research Services
- Baking Brown Bread in Tin Cans | The Make your Own Zone