Cemetery Recipes: Red Lantern Cheese Dip

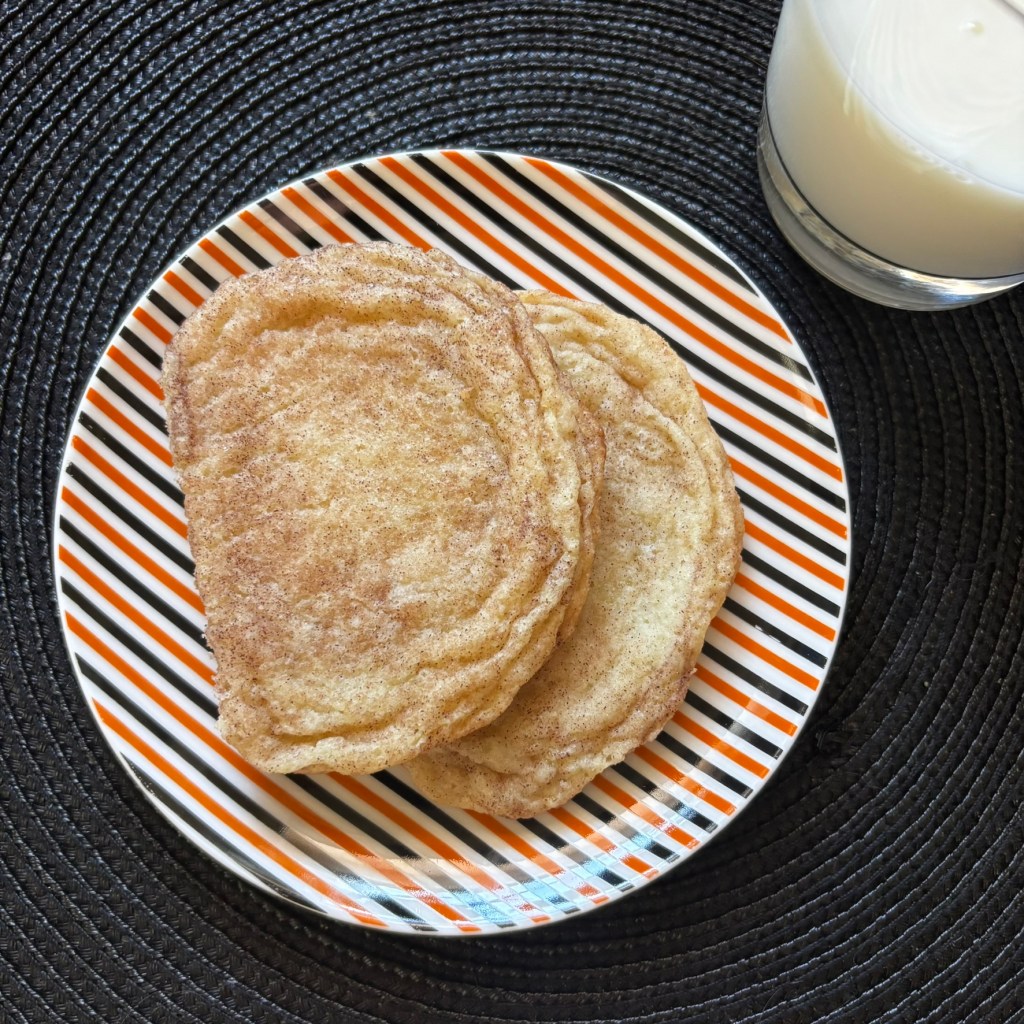
For this month’s cemetery recipe, I am stepping away from baked goods and trying out something savory. When I came across this simple dip recipe, I knew it had to be my next kitchen adventure.

This recipe comes from the gravestone of Debra Ann Nelson, who is buried in Dow City Cemetery in Iowa.

Nelson passed away on March 8, 2021, at the age of 56. She was a beloved wife, and community member, known for her warm personality and her love of cooking.1 She had a passion for bringing people together, whether through scouting, teaching water aerobics, or sharing her famous homemade pickles.1

One of the many places where Nelson left her mark, was the Red Lantern Steakhouse in Denison, where she worked and made large batches of their well-loved Red Lantern Cheese Dip.

Now, thanks to this recipe etched in stone, her legacy continues for future generations to enjoy.
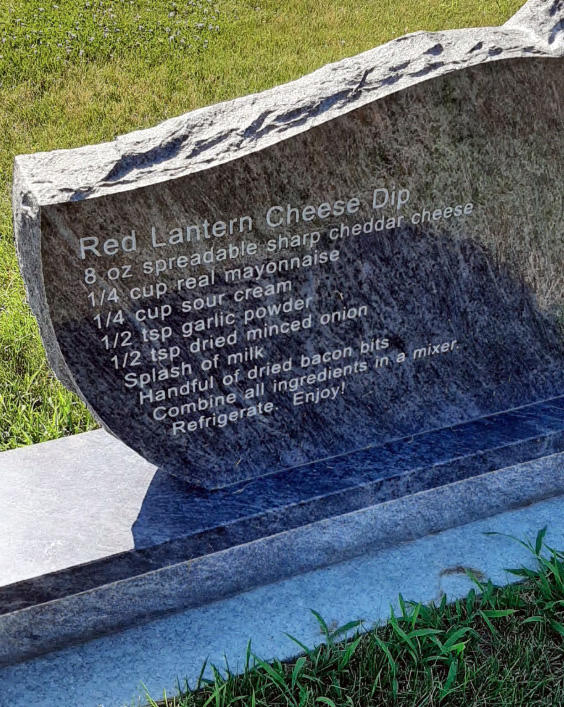
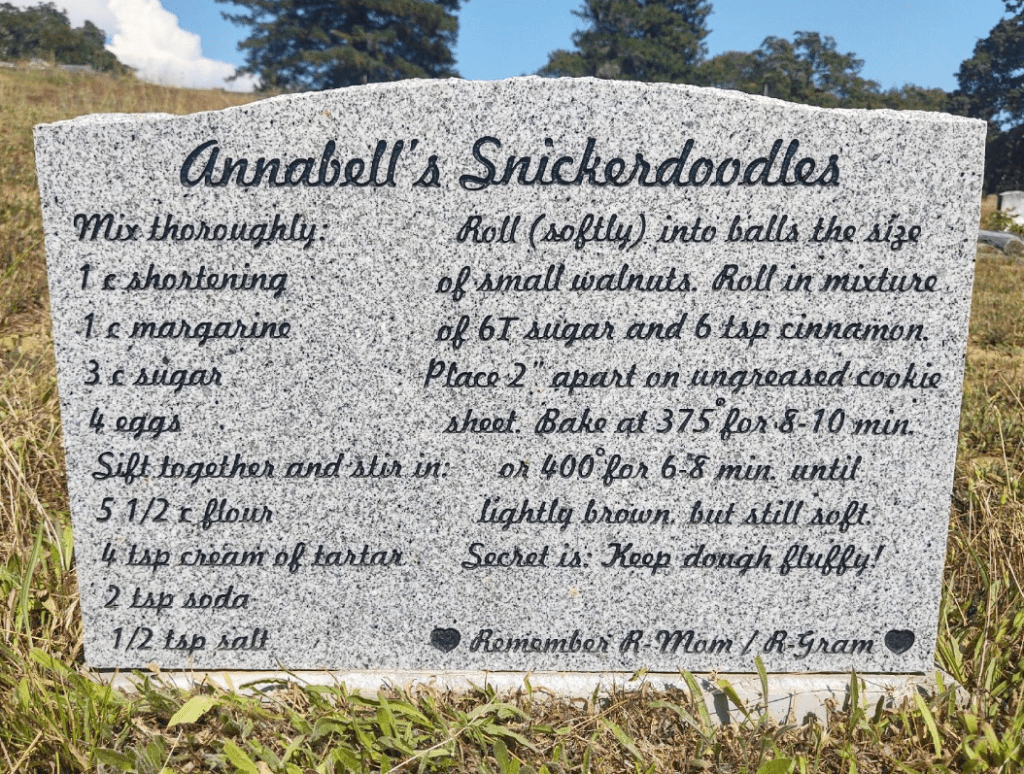
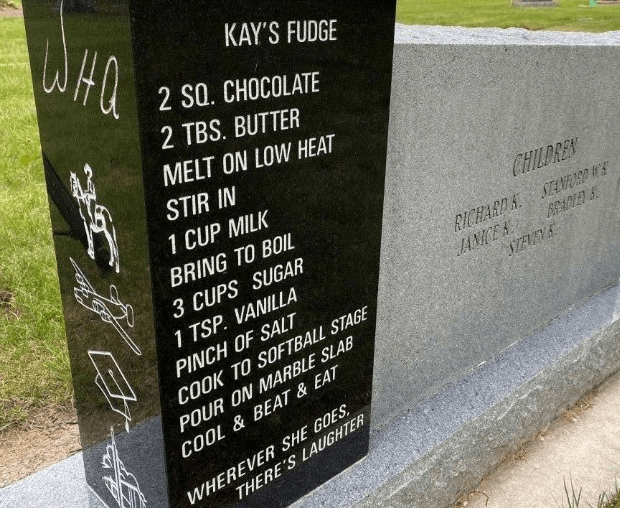
Here is the recipe, as engraved on the tombstone:

Red Lantern Cheese Dip

  • 8 oz spreadable sharp cheddar cheese
  • 1/4 cup real mayonnaise
  • 1/4 cup sour cream
  • 1/2 tsp garlic powder
  • 1/2 tsp dried minced onion
  • Splash of milk
  • Handful of dried bacon bits

Combine all ingredients in mixer. Refrigerate. Enjoy!

In the Kitchen

My first attempt at making this dip came with a bit of a challenge. I had trouble finding the exact spreadable sharp cheddar cheese called for in the recipe.

It’s an issue I have run into before. Being in Canada, our products and brands are a bit different from what can be found in the United States, where most of the recipes I have tried come from. I have made do so far, but for this one, I scouted the grocery store to no avail.

I settled on a spreadable aged cheddar, which was all I could find, and hoped it would be a close match.


The process itself was incredibly simple—just a quick mix of ingredients and into the fridge it went! However, the consistency turned out to be a little runnier than I had expected, likely due to the cheese substitution. While the flavours were delicious, the aged cheddar had a much stronger taste, that overpowered the garlic and onion flavours. I had a feeling that it wasn’t quite the taste that Nelson had intended.

Since I didn’t think I had done this recipe justice, I put it aside until I could try again with better success.

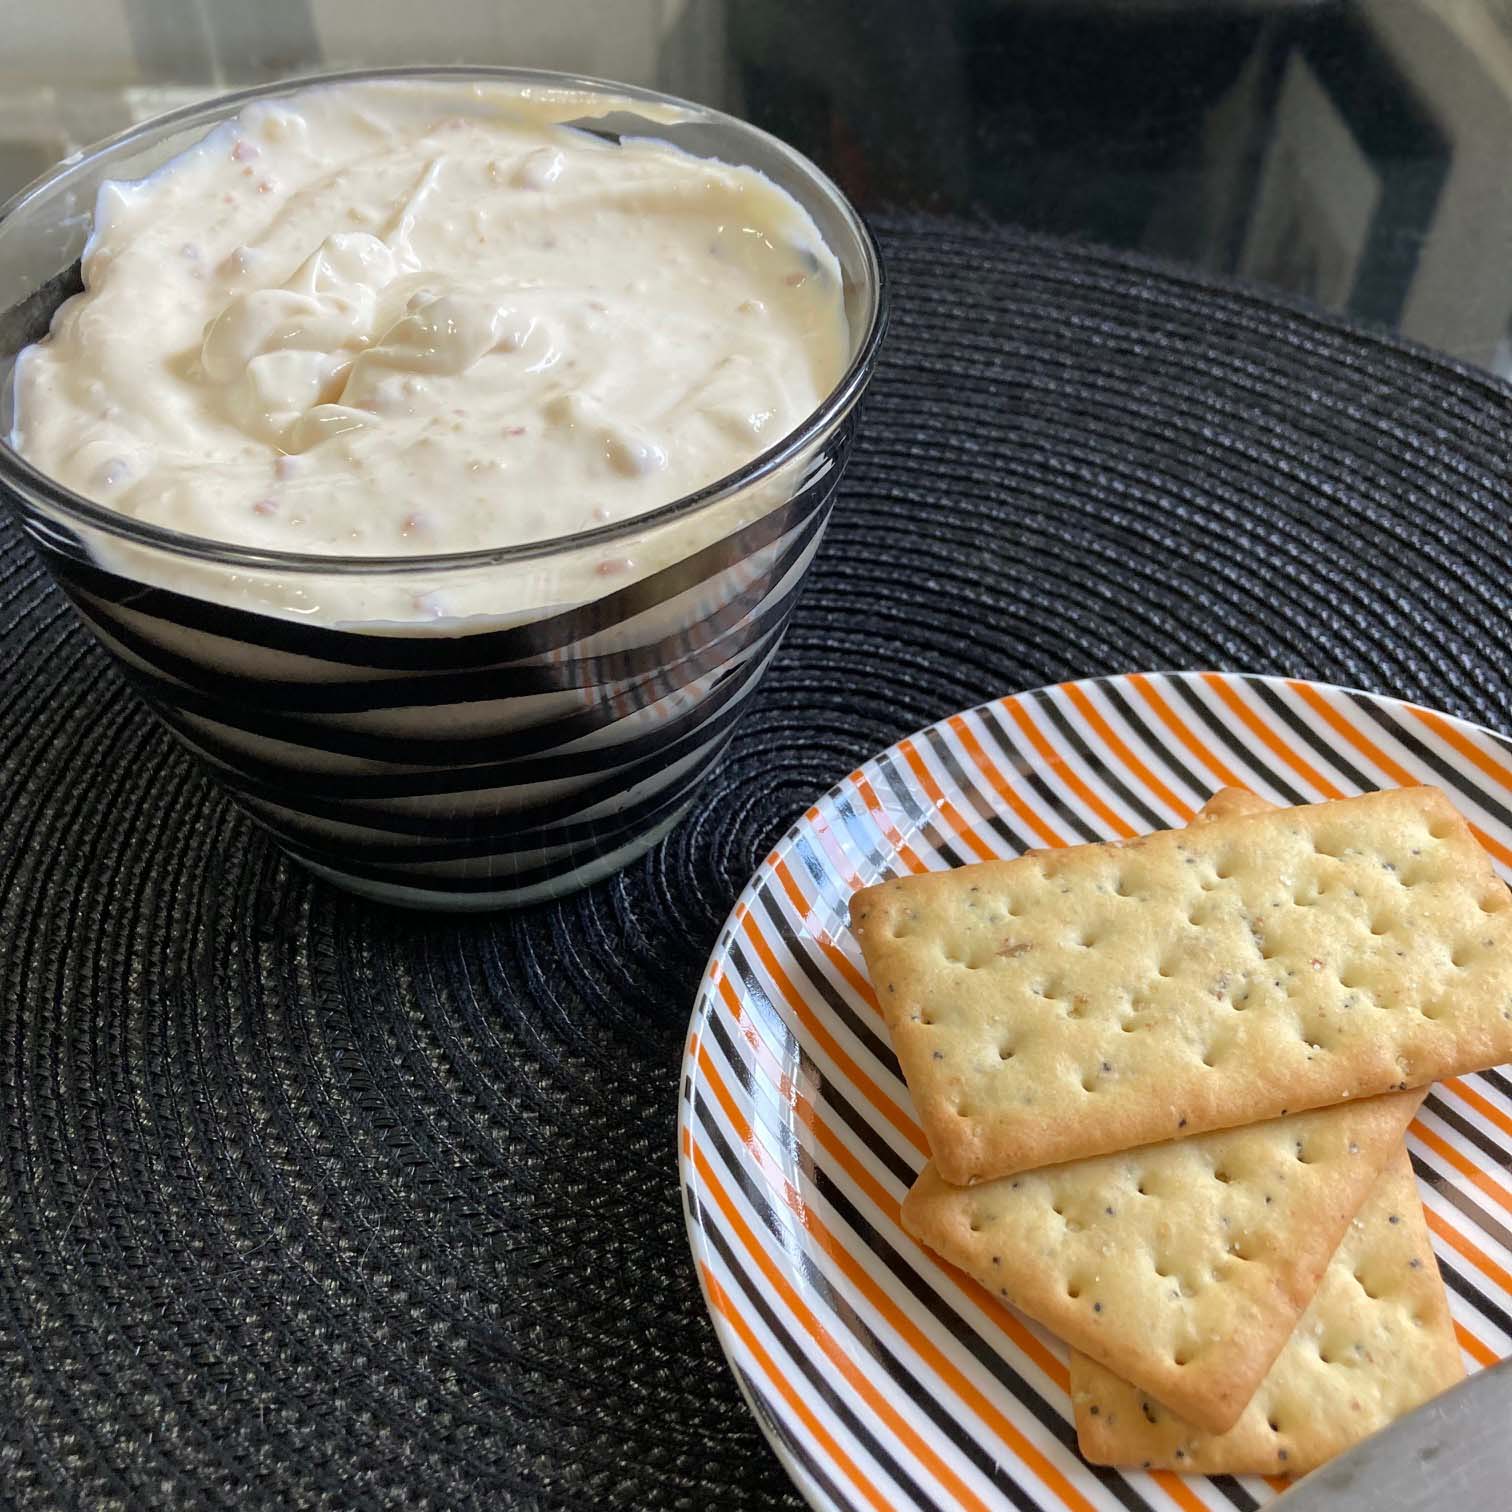
And that’s when I got the idea. Could Cheese Whiz be the answer? It’s definitely more in line with the smooth spreadable consistency I was looking for.

My second attempt at making this recipe went just as quickly as the first, thanks to its simplicity. I gathered my ingredients, this time using a cup of Cheese Whiz in place of the spreadable sharp cheddar cheese. I then mixed them together in a bowl and set the dip aside. This time, I decided to make something special to go with it—I didn’t have any crackers or chips on hand, so I made my own!

Using a pizza cutter, I sliced up two flour tortillas, then coated them in some avocado oil, salt, and pepper before baking them in the oven at 350°F for about 10 minutes. I kept a close eye on them to prevent them from burning, and once they were golden and crisp, they were ready to go.

Excited to taste the dip, I scooped up a bite with one of my freshly baked chips—only to realize I had skipped an important step: refrigerating it! My initial taste was overwhelmingly Cheese Whiz-forward, without the blended flavours I was hoping for. So, I saved some of my homemade chips, and let the dip chill overnight.

The extra time made a big difference. By the next day, the flavours had blended nicely, mellowing out the strong processed cheese taste and bringing out the garlic and onion flavours. This version felt much closer to what I imagined the original dip would taste like.

I would definitely make this recipe again, especially for a family gathering or cozy movie night—it makes a great snack!

There’s something special about making a recipe like this, one tied to a person’s life and memories, and in this case a restaurant. Whether served up at a steakhouse or shared around a family table, this dip is a nice reminder of how cooking is community.

Will you give this recipe a try? I would love to hear how it turned out for you!

Thanks for reading!


References:

  1. Deb Nelson Obituary | Tribute Archive

Cemetery Recipes: Snickerdoodles

For this month’s cemetery recipe, I decided to venture back into the world of cookies. After recently finding this recipe etched in stone, I thought it would be a perfect time to try another Snickerdoodle recipe.

This will be the second Snickerdoodle gravestone recipe I have tried, and I was curious to see how this version would compare.

This cookie recipe comes from the gravestone of Sharon Faye Johnson Lawrence, who is buried in Mount Hope Cemetery in Webb City, Missouri.

Sharon passed away on May 25, 2020, at the age of 73, after a sudden illness. A beloved mother, grandmother, and member of the community, Sharon was known for her love of gardening and spending time with her family—especially her grandchildren.1

Her obituary also mentions how much she enjoyed baking and cooking for her family, which makes this recipe engraved on her tombstone even more special.1

This snickerdoodle recipe is now forever part of her legacy, engraved on her tombstone for future generations to discover and enjoy. It’s a beautiful memorial, accented by the lovely image of a cookie jar and plate of cookies.

Here is the recipe, as written on the gravestone:

Snickerdoodles

  • 1 cup soft shortening (part butter)
  • 1 ½ cups sugar
  • 2 eggs
  • 2 ¾ cups gold medal flour
  • 2 tsp cream of tartar
  • 1 tsp soda
  • ¼ tsp salt

Heat oven to 400° degrees. Mix shortening, sugar, and eggs thoroughly. Measure flour by dip-level-pour method or by sifting. Blend all dry ingredients. Stir in. Roll into balls the size of small walnuts. Roll in mixture of 2 tbsp sugar and 2 tsp cinnamon. Place 2 apart on ungreased baking sheet. Bake 8-10 minutes. (These cookies puff up at first then flatten out)

In the Kitchen

In my kitchen, the baking experience was straightforward and fun. This gravestone recipe was more detailed than most, so it was very easy to follow. Mixing the ingredients was a breeze, and I loved the smell of cinnamon that filled the air. Rolling the dough into small balls and rolling them in the sugar mixture was my favorite part of the process.

I didn’t have the exact flour that Sharon’s recipe called for, but I used the Great Value all-purpose flour I had on hand. Even though it wasn’t the Gold Medal brand specified, the cookies still turned out wonderfully.

I did learn that there is a name for the way I usually measure out dry ingredients. I was curious about the dip-level-pour method that was named in the directions, so I did a quick Google search.

Apparently, this is a common measuring technique, where you scoop the flour into a measuring cup till it’s slightly mounded at the top, then you level it off with a flat edge, like a knife, and then pour that into your mixing bowl.2

The recipe made a big batch of cookies. I ended up baking two and half trays full. I think I maybe should have spaced them out a wee bit more, as most of them spread out into each other. In the end, that wasn’t a big deal, though.

The smell as they baked was lovely, and the warm, slightly crunchy cookies that emerged from the oven were just perfect!

There is something really heartwarming about baking a recipe with such a personal story behind it. Sharon’s love for baking and sharing meals with her family lives on in this recipe. It’s easy to imagine her making these delicious Snickerdoodles for her grandchildren, sharing the happiness and comfort that only homemade cookies can bring.

Will you give this recipe a try? I’d love to hear how they turned out! Whether you enjoy them with a glass of milk (my favorite) or as a treat to share with friends, they are a sweet way to remember Sharon’s love for her family and her passion for baking.

Thanks for reading!


References:

  1. Sharon Faye Lawrence obituary | Parker Mortuary and Crematory
  2. Measuring Flour–The Right Way | The Cook Along Podcast

Cemetery Recipes: Annabell’s Snickerdoodles

Today’s gravestone recipe is another one I have seen floating around on the internet pretty frequently. Since the success of last month’s cookie recipe, I thought it might be time to try another one, this time with some baking involved. 

I am pretty sure I have had a snickerdoodle before, but I don’t recall when. I asked my mother if she had ever made them before, and she said yes, quite often actually. So for today’s gravestone recipe, I try my hand at making Annabell’s Snickerdoodles.

This tombstone treat comes from the gravestone of Annabell R. Gunderson of Willits, California. Found in Willits Cemetery, this gravestone recipe takes up the entire backside of Gunderson’s grey granite gravestone.

Annabell Gunderson passed away at the age of 87, in 2007 after a battle against an unidentified illness.1 In life Gunderson was very active in her community, volunteering her time to multiple organizations. In particular with the St. Anthony’s Ladies Guild.1 Gunderson was known to especially love helping with the yearly enchilada feed—a fundraiser where trays upon trays of enchiladas are made and sold.1 

She is lovingly remembered as a great cook and for her hugely popular snickerdoodles. A recipe that now lives on, etched in stone.

Here is the recipe as engraved on the tombstone:

Annabell’s Snickerdoodles

Mix thoroughly:

  • 1 c shortening
  • 1 c margarine
  • 3 c sugar
  • 4 eggs

Sift together and stir in:

  • 5 1/2 c flour
  • 4 tsp cream of tartar
  • 2 tsp soda
  • 1/2 tsp salt

Roll (softly) into balls the size of small walnuts.

Roll in mixture of 6T sugar and 6 tsp cinnamon.

Place 2” apart on ungreased cookie sheet.

Bake at 375° for 8-10 min. or 400° for 6-8 min. until lightly brown, but still soft.

Secret is: Keep dough fluffy!

Making the Recipe

I spoke to my mom about making this recipe, and right away she was surprised at how much this recipe makes. She suggested I cut the recipe in half to make a smaller batch. Normally I do try to make the recipe as it is written, but I thought making half of this recipe would be more manageable for me in my small kitchen. After learning about Gunderson’s love of community and cooking, I think I understand why this recipe makes such a big batch. 

So after getting out my ingredients and figuring out the new measurements on my kitchen blackboard, I got started on mixing up a batch of Annabell’s Snickerdoodles.

The recipe is very easy to follow, and is very well written. I did have to soften my margarine and shortening in the microwave a bit so it would combine nicely with the sugar and then the eggs. I made sure not to heat them too much though, as I didn’t want to cook the egg at all. 

After that, I sifted in the dry ingredients till the mixture was well combined. I tried my best to not overwork the dough, keeping Annabell’s secret in mind.

Now came the fun part! 

I made sure to mix the sugar and cinnamon very well and put the mixture into a dinner plate so I had lots of surface to roll the dough around. To form the cookies, I pinched off small parts of dough, rolling them between my hands into a ball and then rolled them in the sugar and cinnamon mixture. Then I shaped them a little more with my hands before placing them on the ungreased cookie sheet.

I did flour my hands now and then while rolling the dough to try and stop it from sticking to my hands. I tried my best to space the cookies out evenly between two cookie sheets. I didn’t realize that the cookies would spread, so if I made them again, I would space them out a little more between multiple cookie sheets instead of only using two sheets.

I then placed both cookie sheets in the oven to bake at 375° for 10 minutes. I did a bit of washing up while I waited for them to turn a golden brown. 

Even though they did spread out a bit on the cookie sheet, it wasn’t terrible. After cooling on top of the stove for 10 minutes I was easily able to break them apart without ruining their shape too much. 

These cookies turned out amazing! I was a little bit daunted by the amount of work that had to go into these. But, it turned out to be not as intimidating as I thought, and the result are some of the best cookies I’ve ever tried—especially right out of the oven.

They are soft and buttery, sweet with a hint of cinnamon. I don’t think they will last too long in my house, as I couldn’t eat just one. I love how they turned out and will definitely be making these again!

This recipe would be great for someone looking for the perfect cookie for a bake sale or cookie exchange. They would also be a fun cookie to make in the kitchen with kids, as I am sure they would love rolling the dough around into the sugar and cinnamon. 

Have you tried this recipe before? Do you have a favorite snickerdoodle recipe? I would love to read about it in the comments!

Thanks for reading!


References:

  1. Annabell Gunderson obituary | The Ukiah Daily Journal

Cemetery Recipes: O’Neal’s Peach Cobbler

I’ve been craving a sweet treat lately, so I think it’s time for another cemetery recipe! Peaches are coming into season right now so I thought why not try O’Neal’s Peach Cobbler? This tasty treat would also go well with a side of ice cream. It is summer after all!

O’Neal’s Peach Cobbler recipe can be found on the gravestone of O’Neal Bogan “Peony” Watson, in New Ebenezer Cemetery in Castor, Louisiana. O’Neal’s son Charlie McBride loves this family recipe so much, that he had it inscribed on his Mother’s grave after she passed away in 2005. He said “It really is just a great recipe”.1 In an article for the Sault Lake Tribune, Charlie reminisced about memories that making this recipe brought up. It’s a perfect example of how these cemetery recipes are a sweet way to remember our loved ones. 

Here is the recipe, as inscribed on the gravestone:

O’Neal’s Peach Cobbler

  • 1 c. Flour
  • 2/3 c. Sugar
  • 2 tsp. Baking Powder
  • 1/2 c. Butter
  • 1/4 tsp. Salt

Mix ingredients. Add 3/4 c. Milk.

Put fruit into pan. Pour on topping.

Bake at 350’ until done.

I always find it interesting how descriptive or nondescriptive recipes found on gravestones can be. I realize it might be too expensive to inscribe too much text on a stone. I do appreciate how creative some authors get to skirt around that. This recipe is a short and sweet one, pun intended. The only things I found missing was the amount of fruit, and how long to bake it for.

Rosie Grant over at GhostlyArchive, of TikTok fame, used 1 can of whole peaches that she cubed up, so I did something similar and used 1 big can of sliced peaches. I drained the peaches before putting them in the pan and tried to make sure they were evenly distributed. 

I followed the recipe as closely as possible, mixing the dry ingredients first, then adding the milk. I poured on the topping as evenly as I could, now it was time for it to go into the oven. The recipe says to bake it at 350’ “until done”. I wasn’t sure how long that should be, so I started with a timer for 20 minutes. After 20 minutes it wasn’t looking cooked through, so I left it in for another 10 minutes, then another 5. After 35 minutes it was looking nice and golden so I took it out to cool.

I paired my first serving of O’Neal’s Peach Cobbler with Häagen-Dazs vanilla ice cream. It was to die for! The topping puffed up, creating a lovely fluffy texture that combined nicely with the soft peaches. I’ll be keeping this first batch for myself, since there isn’t enough left to share! But, I will need to make this again for a friend or family gathering.

Have you tried recreating any cemetery recipes yet? Share your favorites in the comments! 

Thanks for reading! 


References:

  1. Family Recipes Etched in Stone. Gravestone, That Is. | The Sault Lake Tribune
  2. O’Neal Bogan “Peony” Watson | Find a Grave
  3. O’Neil’s Peach Cobbler | GhostlyArchive on TikTok

Cemetery Recipes: A Good Carrot Cake

Today on the blog I wanted to share another cemetery recipe with you. All the recipes I have made so far have been sweet treats, and today’s recipe is no different. It’s the Easter long weekend, so I thought today’s recipe would be a perfect fit – A Good Carrot Cake. 

This recipe is a little different than the previous ones I have made. It can be found on a white tablet gravestone for Christine W Hammill in Ferndale, California. Her stone sits beside the stone for her husband Richard. The difference is that Christine and Richard are still living.

They seem like pretty fun folks as well, based on their gravestones! Not only can this delicious recipe be found on the back side of Christine’s gravestone, they both also have some funny epitaphs on their headstones.


The white granite tablet gravestones read:

“Oops, / I should / have listened / to my wife.”

Richards S. Hammill

June 3, 19__ – 

“Yeah. / Look where / we ended up.”

Christine W. Hammill

Nov. 

Unfortunately, I haven’t been able to find more information about the Hammills and where their future resting place is, but I do know that Christine makes an excellent carrot cake.

Here is the recipe:

A Good Carrot Cake

  • 2 cups flour
  • 4 eggs
  • 2 tsp. baking powder
  • 2 cups sugar
  • 1 1/2 tsp. soda
  • 1 1/2 cups oil
  • 1 tsp. salt
  • 2 cups grated carrots
  • 2 tsp. cinnamon
  • 1 (8 1/2 oz.) crushed pineapple, drained
  • 2/3 cup chopped nuts

Sift together flour, baking powder, soda salt, and cinnamon. Beat eggs and add sugar. Let stand 10 mins. Mix in oil, pineapple, carrots, nuts, flour mixture. Turn into 3 greased and floured 9-inch round cake pans. Bake at 350’ for 35 – 40 min. Cool in pans for 10 min, remove to wire racks, and cool well. 

Vanilla Cream Cheese Frosting

  • 1/2 cup butter
  • 1 (8 oz.) cream cheese
  • 1 tsp. vanilla
  • 1 pound powdered sugar, sifted

Mix butter, cream cheese, vanilla then add sugar. First between layers, top and sides.

This is one of the more thorough sets of baking instructions I have come across on a gravestone. It didn’t need any guesswork at all. The recipe is very easy to follow and create. I started with the prep work first; chopping, grating, and measuring out ingredients to make the mixing process a bit smoother. 

I did start off thinking I would only need two cake pans, but I did need to make a third layer. I only filled the cake pans about halfway with batter because I had a feeling they would rise as they baked. They did rise as I suspected so that left batter for a third layer. I only have 2 cake pans though. I put the first two pans in the oven for 35 minutes and used the toothpick trick to test if they were done. 

If you don’t know this trick, you take a toothpick and stab it into the middle of the cake, touching the bottom of the pan. If it comes out clean when you pull it out, it means the cake is done. If there is batter on the toothpick when you pull it out, it means the center is not cooked all the way through and should go back in for a few more minutes. 

After the first two layers were done, I let them cool for ten minutes then removed them from the pan and placed them on a wire rack to continue cooling. Then I put the third layer into the oven to bake. This did make the baking process a bit longer, but it wouldn’t be an issue if you have extra cake pans. 

I used the time while the last layer was baking, to make the cream cheese frosting. I have to say, it’s the best frosting I have ever made. Sifting the powdered sugar made all the difference in creating a smooth and creamy frosting. I ended up with some extra frosting as I was unsure how much to frost in between the layers. I was afraid to run out of frosting for the top and the sides. I didn’t have to worry though as I had quite a bit left over. I put the leftover frosting in a container and put it in the fridge to use as a cookie dip. I couldn’t let that deliciousness go to waste.

I had some chopped walnuts left over and decided to sprinkle them on the outer edge of the cake as decoration and to use them up. I think it was a nice added touch, but you can decorate it however you like. The white frosting is a lovely base for frosting accents, sprinkles, or any other type of decoration you may want to add to make your cake more festive. 

I love a good carrot cake with a good cream cheese frosting, and this might just be the best one yet. I was curious how the final product would taste with the addition of pineapple. I had never seen that in a carrot cake recipe before. The cake is so moist and sweet, I think because of the pineapple. It’s one of the best cakes I’ve ever made. I shared this cake with my mother and fiancé, and they both agreed, it was delicious. I think this cake would make a lovely finish to an Easter meal, or any meal for that matter. It’s a big cake, so it’s perfect for sharing with loved ones. 

I wish I knew more about Christine and this recipe. I am going to assume that it is a Hammill family favorite. At any rate, I want to say thank you to Christine, for sharing this sweet treat with the world!

Have you tried this recipe before? Do you have a favorite carrot cake recipe? I would love to read about it in the comments. 

Happy Easter, and thanks for reading!


References:

Cemetery Recipes: Kay’s Fudge

Last year I posted a news article on my Facebook page about an interesting tombstone. What makes Kathryn Andrew’s stone so unique is that it features her go-to fudge recipe. Kay had asked for her recipe to be engraved on her tombstone as a way to share her delicious recipe with others. According to Janice, Kay’s daughter, Kay would often share her fudge with friends and family1

Kay passed away in 2019, at the age of 97. She was laid to rest beside her husband Wade. Her now-famous tombstone has been circulating on the internet, with many folks trying out her famous fudge recipe. 

To learn more about Kay and see more photos of her tombstone, visit her memorial page at findagrave.com.

Here is the recipe, as listed on Kay’s tombstone:

  • 2 SQ. CHOCOLATE
  • 2 TBS. BUTTER
  • MELT ON LOW HEAT
  • STIR IN 1 CUP MILK
  • BRING TO BOIL
  • 3 CUPS SUGAR
  • 1 TSP. VANILLA
  • PINCH OF SALT
  • COOK TO SOFTBALL STAGE
  • POUR ON MARBLE SLAB
  • COOL & BEAT & EAT

Interestingly, when the recipe was first engraved, there was a typo. It originally called for a tablespoon of vanilla. I’m told that that would make for some very runny fudge. The tombstone was updated to read a teaspoon of vanilla. I wonder if this correction was made while Kay was still around, and how she would have felt about it?

Of course, I couldn’t write about this unique tombstone without trying my hand at making Kay’s fudge recipe myself. I have dabbled in the past with making candy but never had much success, so I was a bit worried about ruining it. I made sure to take my time and follow the instructions, although I did need to take some time to Google a few things. I used a candy thermometer to make sure I didn’t overcook the ingredients. I did have a little trouble at first as I was not reading my thermometer properly. I started talking to Kay out loud as I poured out the mixture into a bowl. It looked too runny to me. Talking it out with Kay, I put the mixture back on the stove and took a closer look at the thermometer. A Google search clarified that the softball stage is reached between 112 to 115 Celsius. You don’t need a candy thermometer though.

To tell when you have reached the softball stage you can use a spoon to drop a little bit of the mixture into a cold glass of water. If the mixture forms small malleable balls in the water, you have reached the softball stage. After getting that sorted, I watched it carefully to get to the right temperature.

I don’t have a marble slab so I opted to pour the mixture into a bowl to let it cool. I did another Google search to see how long it should cool for. After 15 minutes, it was time to beat the mixture. Again I had to do a little bit of research to see how long to beat the fudge. Traditionally it would be beaten on a marble slab, but I read that you can beat it in a bowl with just a spoon. The trick is to beat it until it is no longer glossy. I was a little unsure about this step as it did not seem to be losing its shine but after a few minutes it did, and it started to firm up. I then poured the mixture into an 8×8 square dish and let it set.

I am very happy with how it turned out! It’s sweet and chocolatey with a lovely texture. It also made a decent size batch. In the spirit of Kay’s generosity, I brought my batch of Kays fudge to a small gathering to share with my friends.

Thank you so much, Kay, for sharing your recipe with us!

To read more about Kathryn’s unique tombstone, visit: Headstone for woman who died at 97 includes her signature fudge recipe | ABC Action News

After all the fun of making this recipe, I started to wonder if there were other tombstone treats I could try? If you know of other cemetery recipes out there, please share! I would also love to hear how your fudge turned out, if you attempted Kay’s recipe.

Thanks for reading!


References:

  1. We tried the famous fudge recipe engraved on a late grandmother’s gravestone | Today.com | June 2, 2021